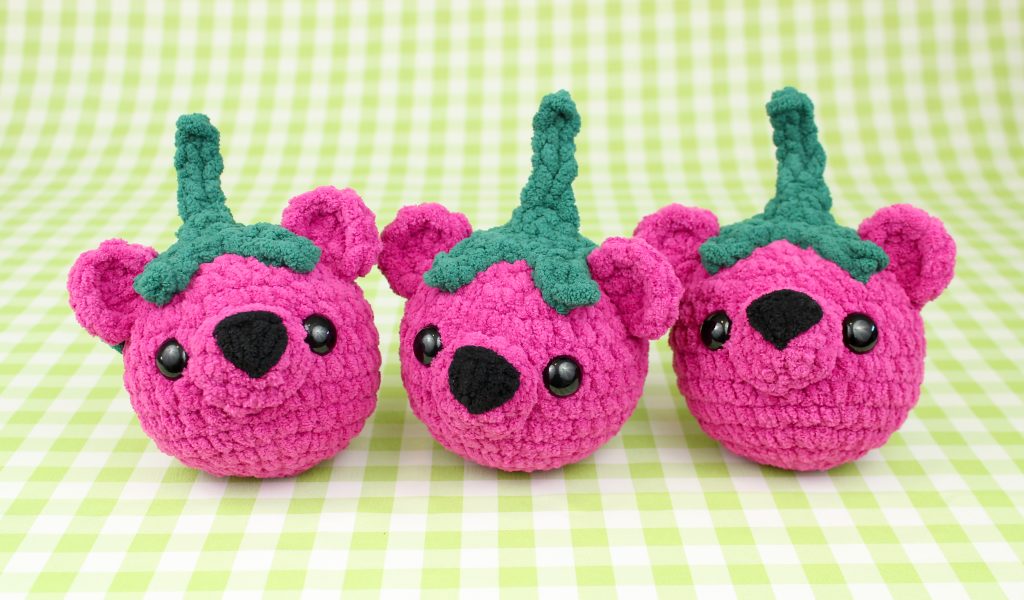
Big Bearies Free Crochet Pattern
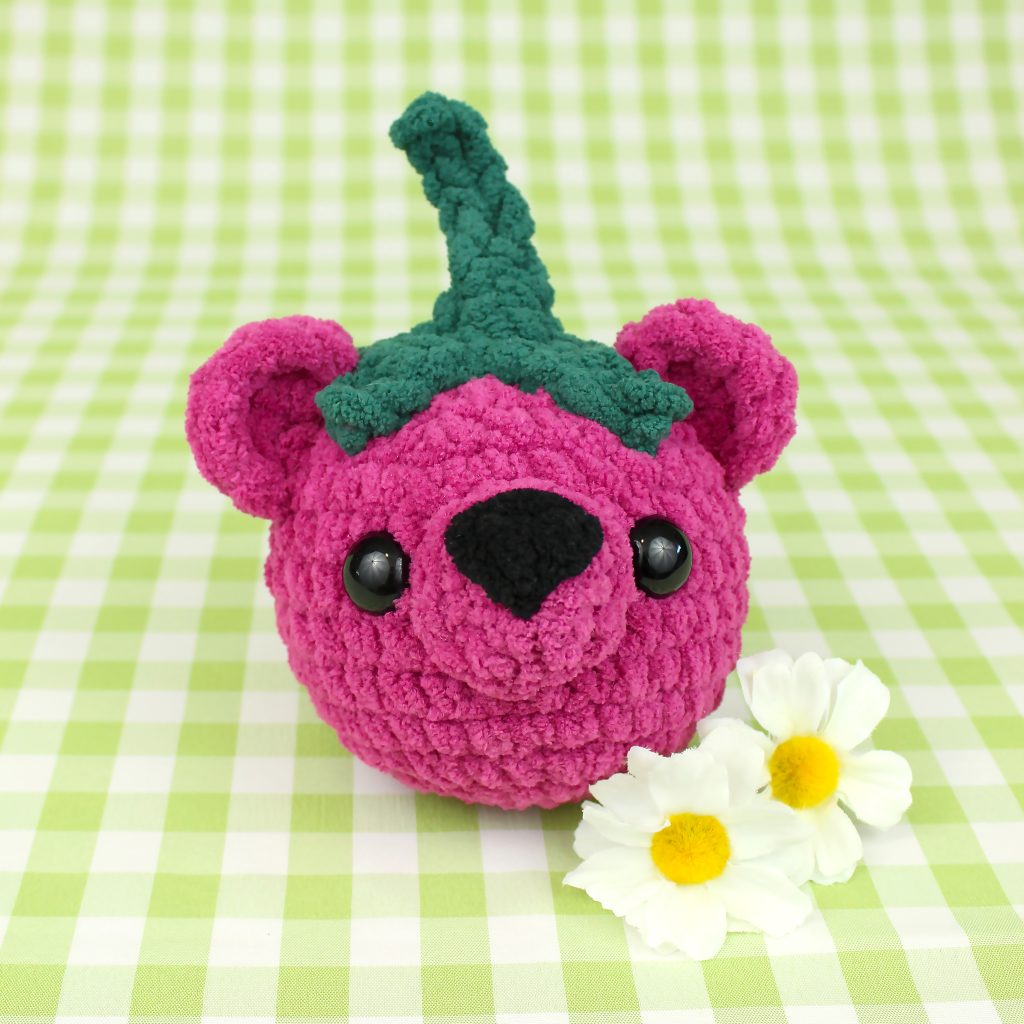
Big Bearies are the perfect project for a crocheter who is new to working with chenille yarn and wants to try amigurumi but also a very fun make for a more experienced crocheter looking for something quick and easy. They make a great gift, especially when paired with their story:
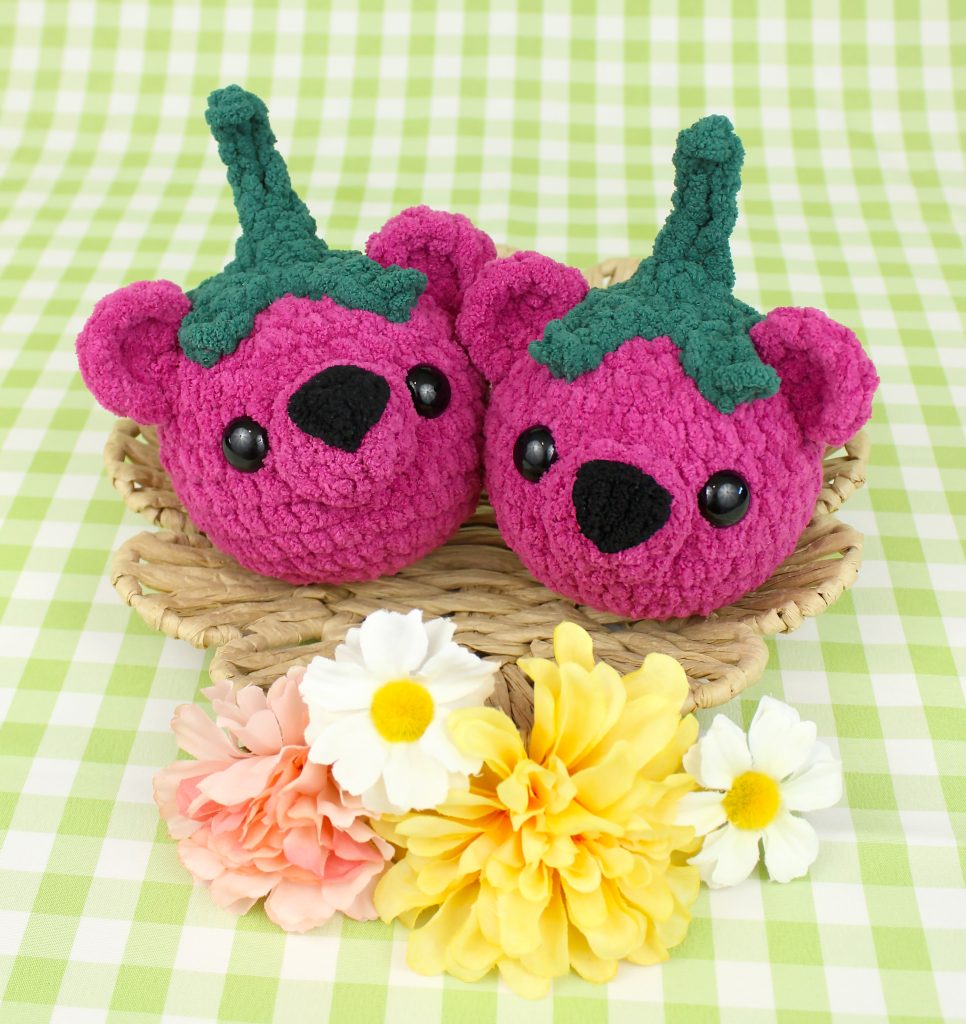
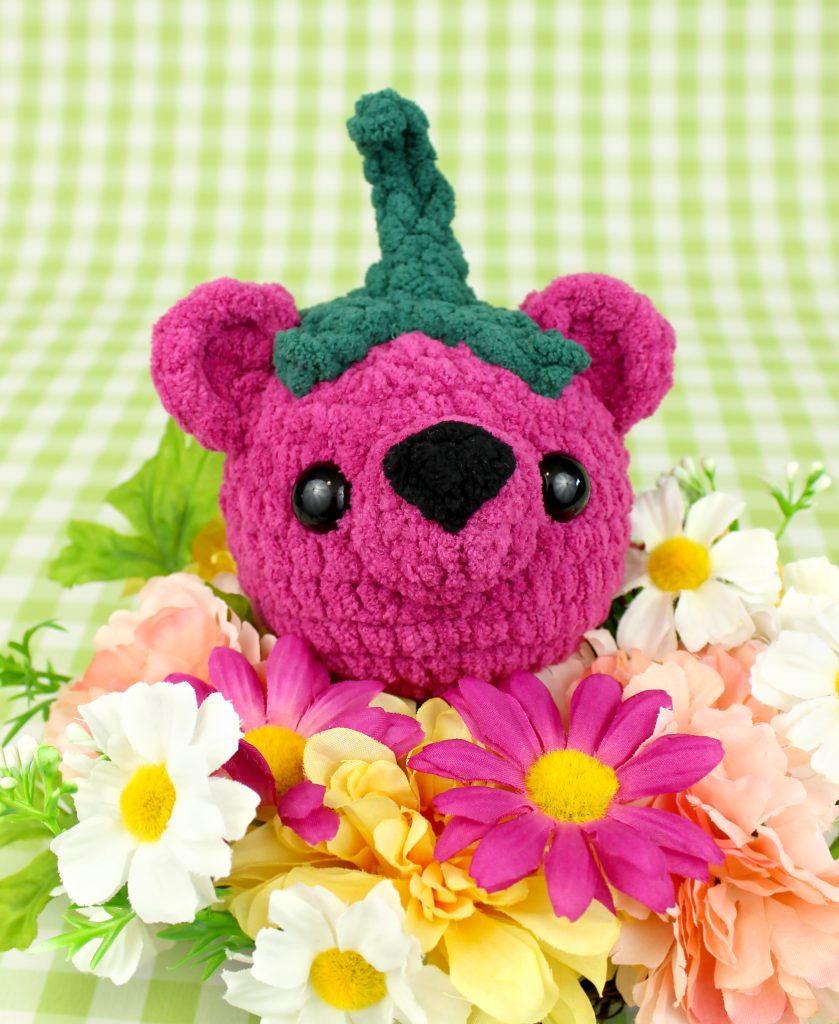
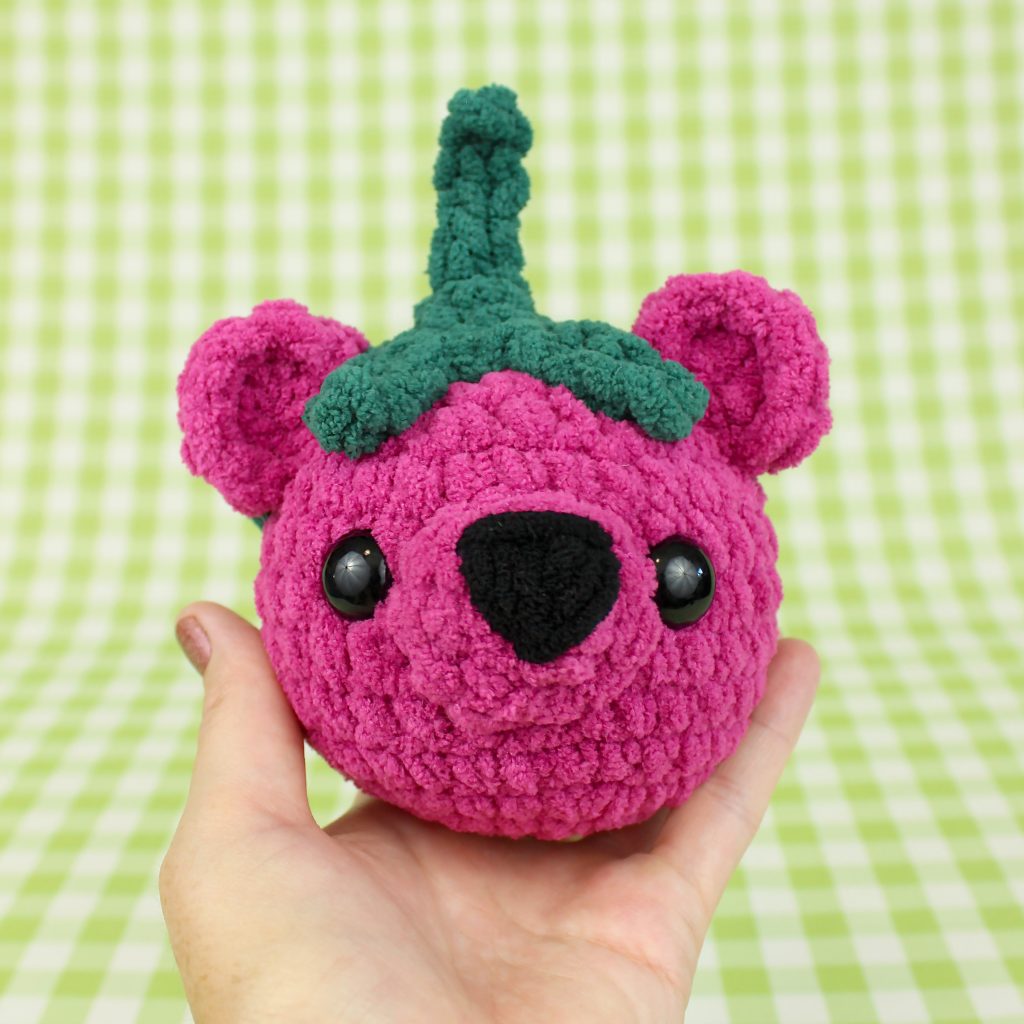
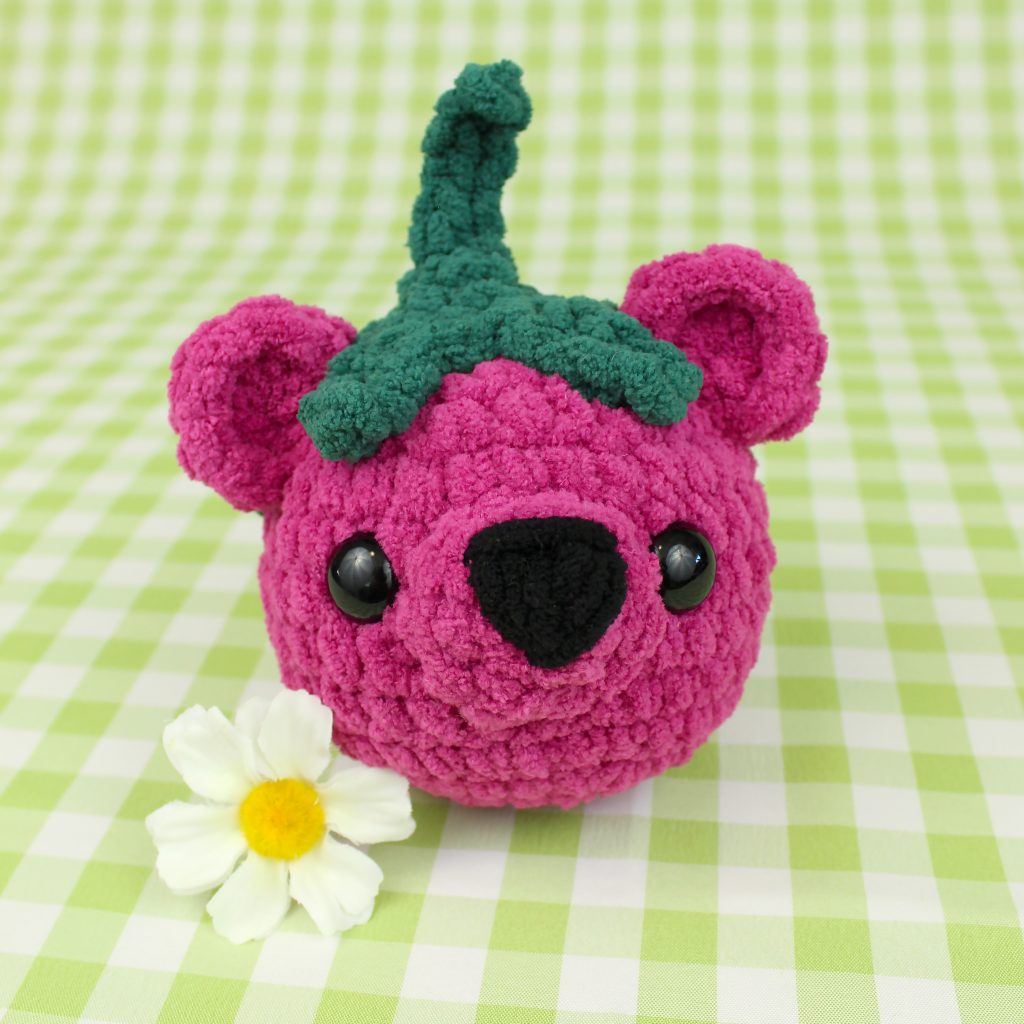
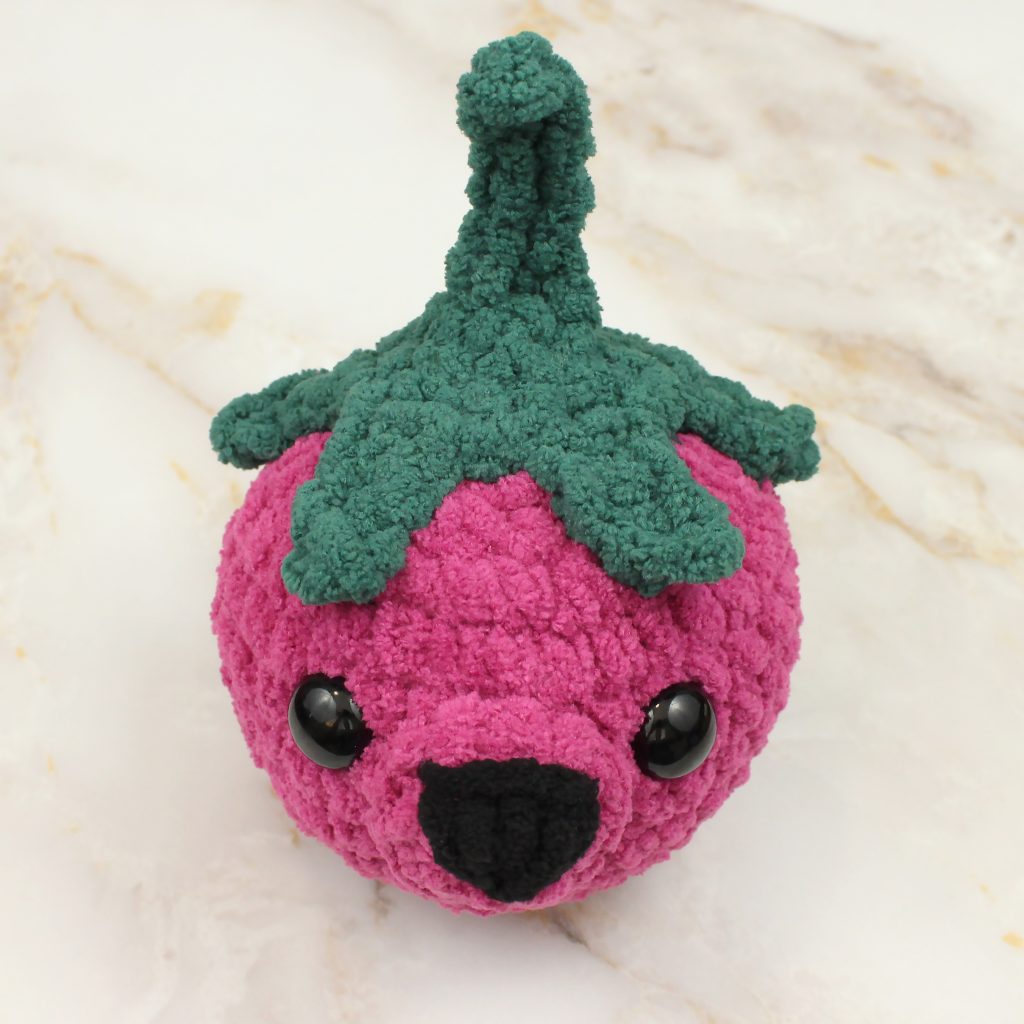
In a quiet corner of a cozy garden, nestled between strawberry patches and raspberry bushes, live a whimsical bunch of pink crochet bears known as Bearies. With soft yarn for fur and a sweet berry scent, these little berry bears are stitched together with handmade love. Their gentle eyes twinkle with glee, and tiny green leaves sprout from the top of their heads like a crown. These curious creatures spend their days napping in sunbeams and collecting wildflowers. Half fruit, half friend, and entirely magical – it is said to be good luck to find one hiding in a basket of freshly picked berries!
Disclosure: This post contains affiliate links. If you click and make a purchase, I will receive a small commission, at no extra cost to you. This, along with the ads shown on this blog, help to ensure that I’m able to continue posting free patterns and tutorials for you to enjoy. Thank you for your support!
Yarn
#6 super bulky weight yarn: Bernat Blanket, approximately 30 yards of Deep Fuchsia (A), 10 yards of Deep Sea (B), and 1 yard of Coal (C).
Yarn Substitute Ideas
This pattern is intended for chenille yarns such as Bernat Blanket, Premier Basix Chenille, Big Twist Plush, Loops & Threads Demi Purl, Premier Parfait Chunky, etc.
Download The Pattern
You can find the FREE pattern by scrolling down. A print-friendly, ad-free PDF of this pattern is also available for a small fee. If you enjoy my patterns, please consider purchasing the PDF – your support is greatly appreciated and will help me keep the new patterns coming! :)
Supplies
- US Size J/10 (6mm) crochet hook or size needed to obtain gauge
- yarn needle
- scissors
- (2) 15mm safety eyes
- stuffing
- stitch marker
Difficulty
Easy
Gauge
Approximately 3 sc & 3 rows = 1 inch.
Gauge is not critical for this project but you may want a different size of safety eyes if your gauge is significantly different than mine.
Finished Measurements
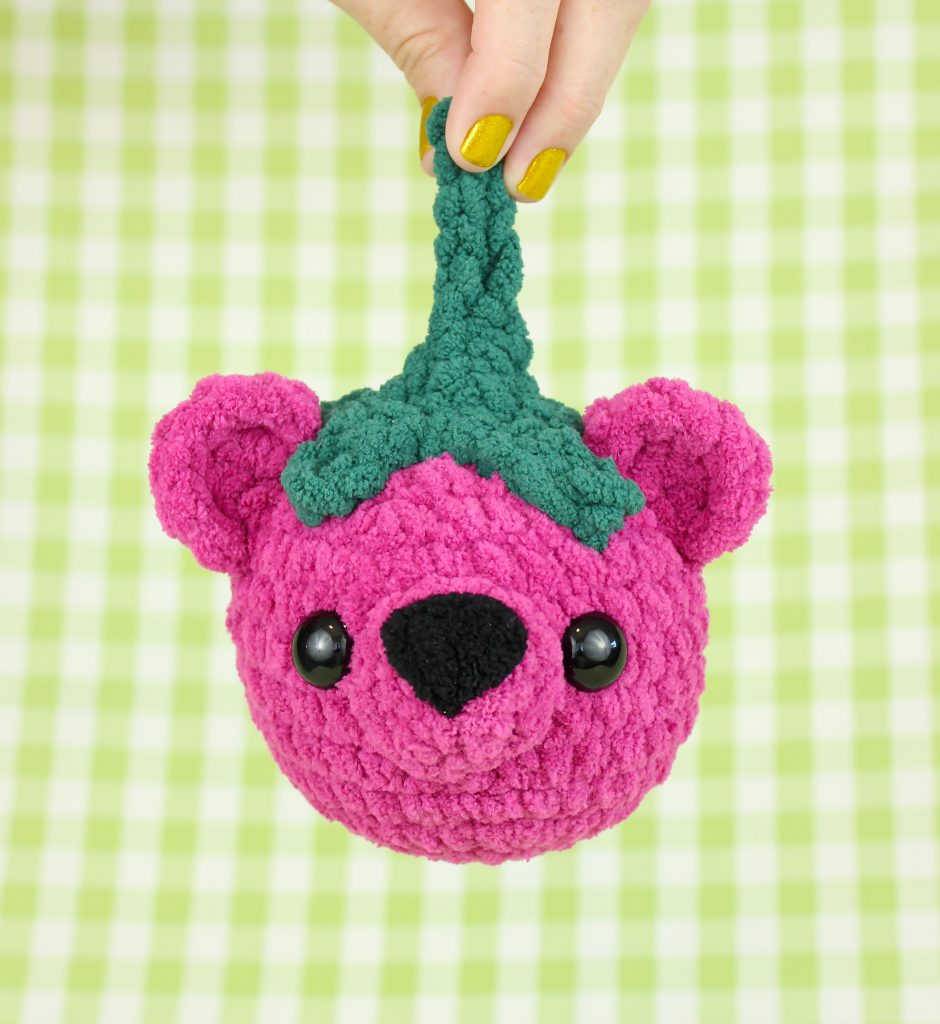
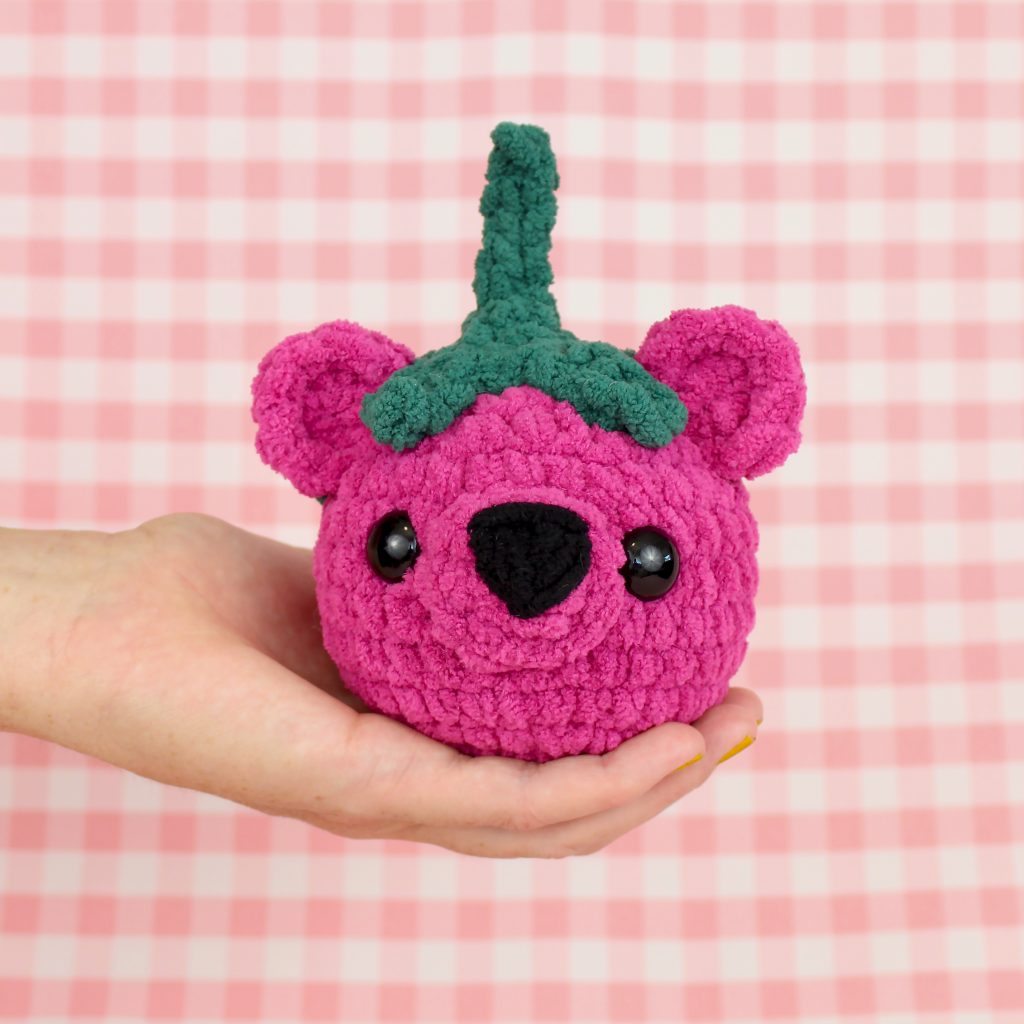
Approximately 4 inches wide & 6 inches tall including the stem.
More Sizes
Want smaller bearies? Check out the original Bearies who are about the size of an egg.
Abbreviations
- ch(s) – chain(s)
- st(s) – stitch(es)
- sl st – slip stitch
- sc – single crochet
- sc2tog – single crochet 2 together (decrease)
- dc – double crochet
Terms of Use
You are welcome to sell any items you make using this pattern, in small quantities. Mass production is prohibited. When selling online, please credit Julie King / Gleeful Things by linking to www.gleefulthings.com or tagging @gleefulthings. You may NOT sell or distribute the pattern itself in any form, alter it to claim it as your own, post it online, or create a video demonstrating the pattern.
Notes
- Pattern is worked in continuous rounds. Do not join at the end of rounds. Use a stitch marker to mark your rounds.
- Sc2tog will count as 1 sc in final stitch count at end of rounds.
Instructions
Head
Round 1: With A, make a magic ring, ch 1 (does not count as a st), 8 sc in ring – 8 sc.
Round 2: 2 sc in each st around – 16 sc.
Round 3: *1 sc in next st, 2 sc in next st; repeat from * around – 24 sc.
Round 4: *1 sc in each of the next 2 sts, 2 sc in next st; repeat from * around – 32 sc.
Rounds 5 – 10 (6 rounds): 1 sc in each st around – 32 sc.
Round 11: *1 sc in each of the next 2 sts, sc2tog; repeat from * around – 24 sc.
Round 12: *1 sc in next st, sc2tog; repeat from * around – 16 sc.
Place safety eyes between rounds 8 & 9 with 6 sts between them. Stuff now or after the following round if you prefer.
Round 13: Sc2tog 8 times, fasten off – 8 sc.
No need to close the hole completely. It will be covered by the top piece.
Nose
Round 1: With A, make a magic ring, ch 1 (does not count as a st), 6 sc in ring – 6 sc.
Round 2: 2 sc in each st around, invisible join to 1st st of round and fasten off leaving enough yarn to sew the nose to the head – 12 sc.
Top
Round 1: With B, make a magic ring, ch 1 (does not count as a st), 6 sc in ring – 6 sc.
Round 2: 2 sc in each st around – 12 sc.
Round 3: *ch 4, 1 sl st in 2nd ch from hook, 1 sc in each of the next 2 chs, 1 sc in each of the next 2 sts of round 2; repeat from * around until you have 6 points completed, invisible join to 1st ch of this round and fasten off leaving enough yarn to sew the top to the head – 12 sc + 6 points (1 sl st & 2 sc each).
Stem
With B, ch 6, 1 sl st in 2nd ch from hook and in each of the next 4 chs, fasten off leaving enough yarn to sew to the top – 5 sl st.
Ears (make 2)
Row 1: With A, make a magic ring, ch 1 (does not count as a st), [1 sc, 6 dc, 1 sc] in ring, fasten off leaving enough yarn to sew the ears to the head – 2 sc + 6 dc.
Assembly
Nose
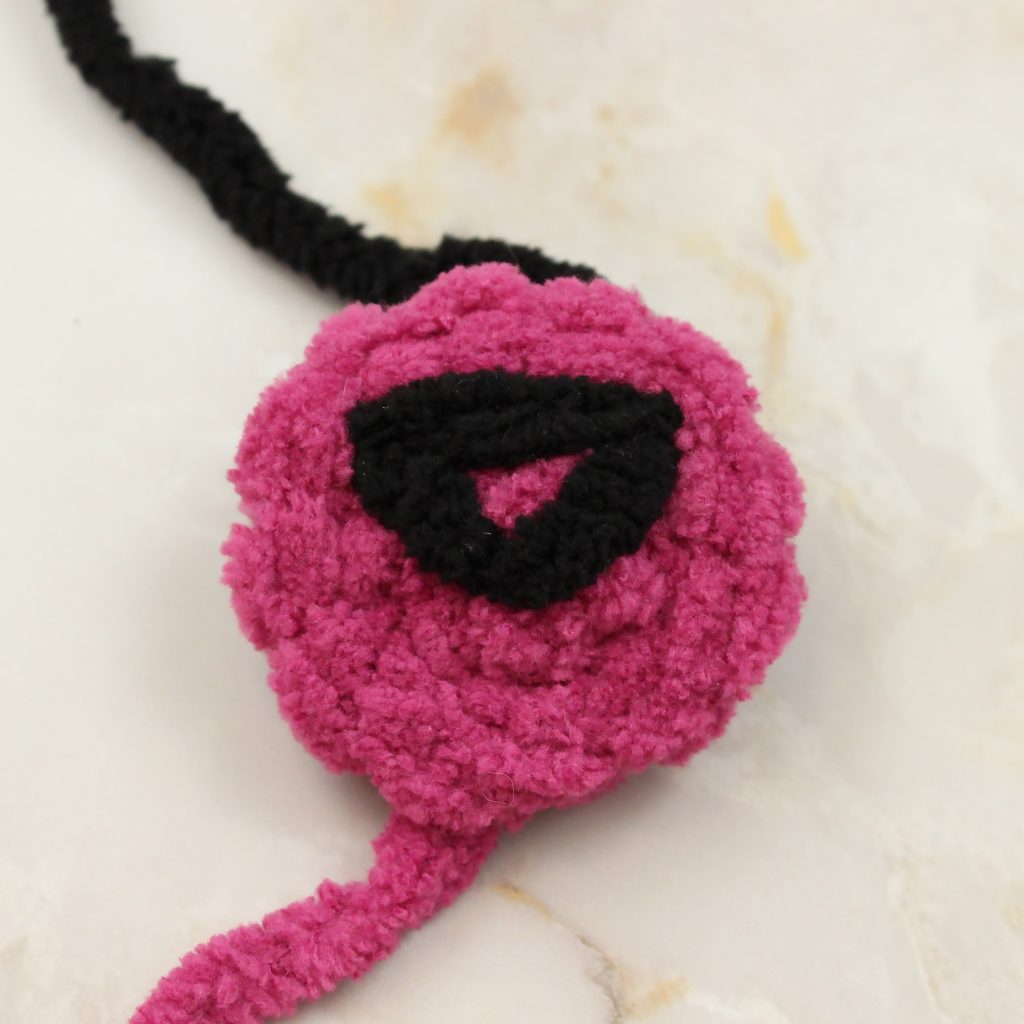
Using C and your yarn needle, stitch a triangle shaped nose.
I like to start the bottom of the nose in the center of the magic ring. Start by stitching 3 lines to create the outline of the triangle and then make as many stitches as you need to fill in the inside of the triangle.
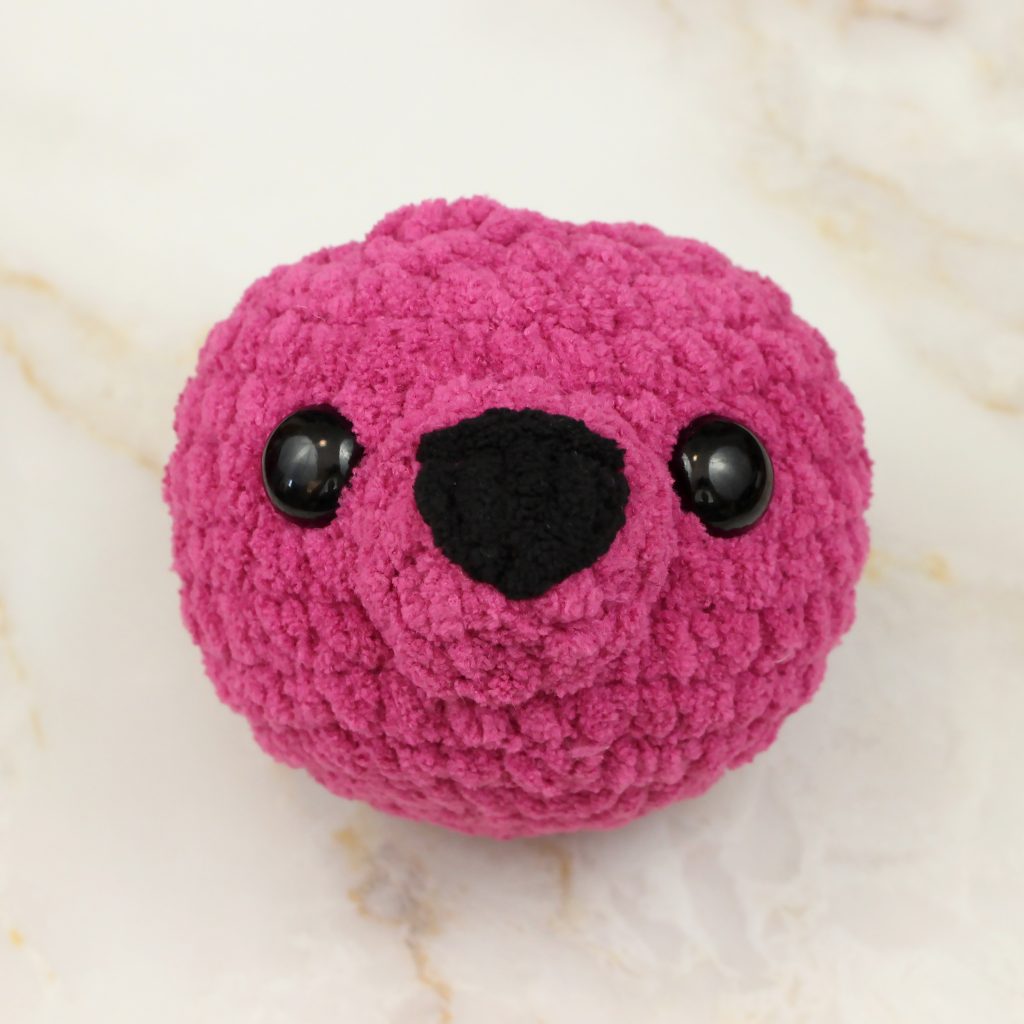
Using the yarn (A) left at the end of round 2 and your yarn needle, stitch the nose to the head so that the top of it is just a bit higher than the eyes as shown here.
Stem & Top
Using B and your yarn needle, stitch the stem to the center of the top. Fasten off.
Using the yarn (B) left at the end of the top and your yarn needle, stitch the top to the head so that there is a point just above each eye. See photo for reference if needed. Stitch securely all the way around the edges of the top. Fasten off.
Ears
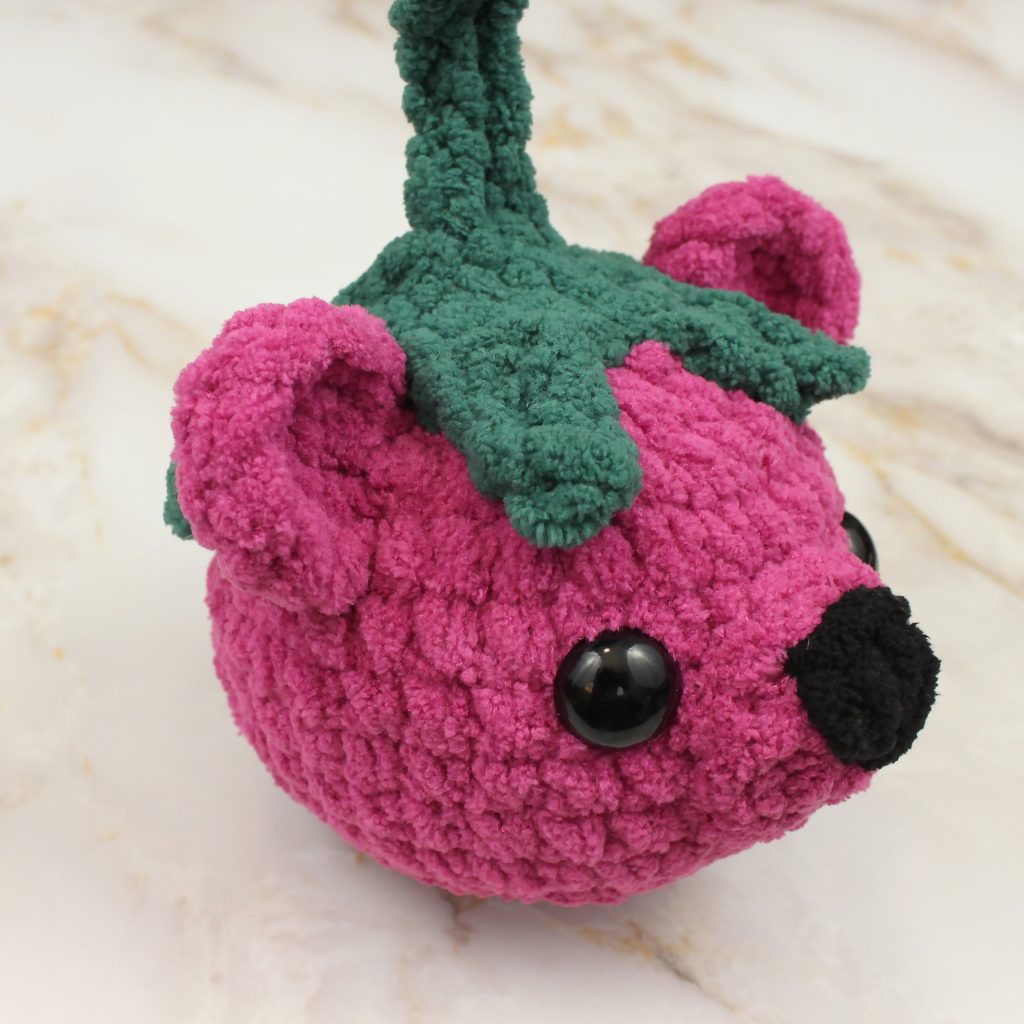
Close the magic ring as usual but try to push all stitches to one side so that it forms a half circle. Using A and your yarn needle, attach each ear between the two points on the side of the head by stitching along the flat part of the half circle. Fasten off.
Share Your Bearies!
I hope you’ve enjoyed this pattern and I would love to see what you made! Please share your photos on social media and tag me @gleefulthings or use hashtag #gleefulthings. Don’t forget to add your project on Ravelry too! :)