Tiny Cacti Free Crochet Pattern
Remember these guys? I posted them a few months ago, I think. They’ve all found homes but now I’m back to share the patterns so you can make your own! I hope you enjoy! Please share a link to pictures of your cacti in the comments if you make one! :D
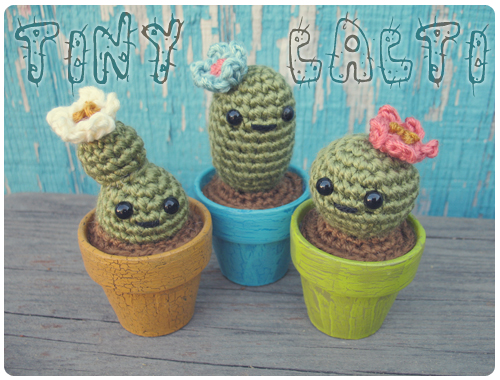
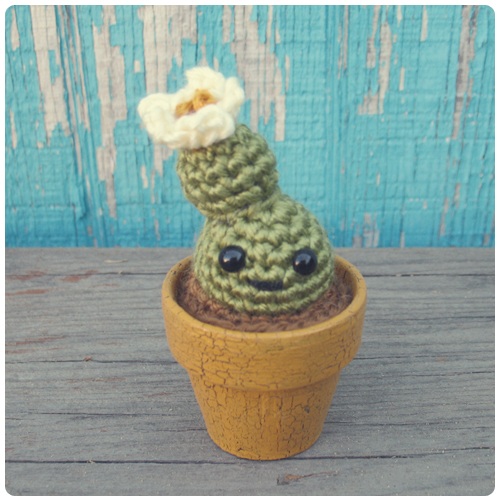
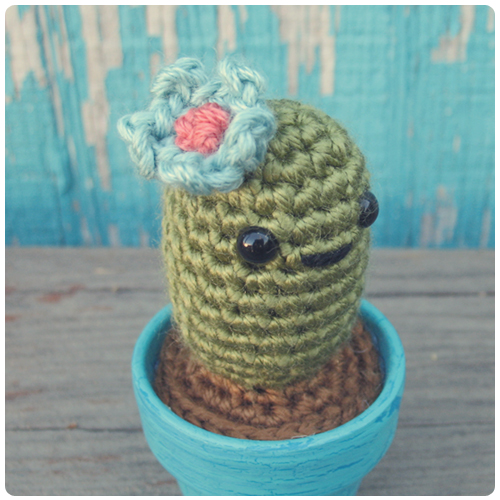
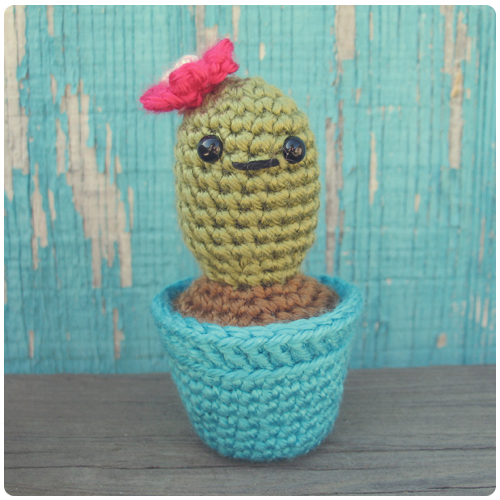
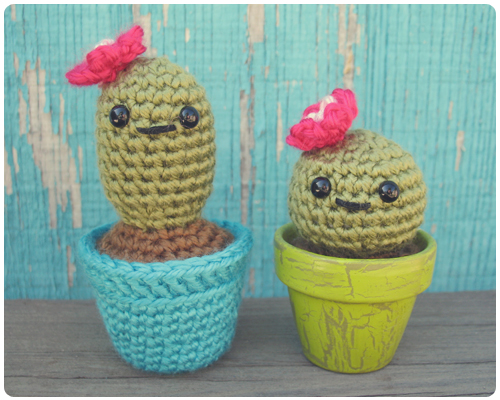
I made these ones in tiny terra cotts pots (purchased at Michael’s for about 60 cents, I think). And I crackle painted them (tutorial here). But in case you don’t want to do that or can’t find the right pot, I also designed a crochet pot pattern for you! (pics below)

● Size E crochet hook
● Yarn needle
● Stitch Marker
● Worsted weight yarn:
Green (CA), Brown (CB), 2 colors for the flower (CC & CD), 1 color for the pot (CE)
● 6mm safety eyes (2 for each)
● Stuffing
● Plastic Pellets (recommended for filling the crocheted pot)
● Black embroidery floss
● Tiny terra cotta pot (optional- you can crochet a pot instead)
The pot I used is approx. 2 inches in diameter at the top and 1 1/2 inches tall.
● Hot glue gun (not needed if you’re crocheting the pot)
Yarn used in examples: Red Heart Soft Yarn in Leaf, Toast & Turquoise. Flowers are Caron Country which has been discontinued :(

ch – chain
sc – single crochet
ea – each
st – stitch
rep – repeat
rnd – round
sc2tog – 2 single crochets together (decrease)
sl st – slip stitch
FO – finish/fasten off
CA – Color A (cactus)
CB – Color B (dirt)
CC – Color C (flower)
CD – Color D (flower center)
CE – Color E (pot)

This pattern is worked in rounds using single crochets (unless you’re making a crochet pot, then double crochets are also used). Do not join at the end of rounds except where the patterns says to. You’ll probably want to use a stitch marker to mark your rounds. Gauge is not important if you’re crocheting a pot, but remember to keep your stitches tight. If you’re using a regular pot, you’ll need to check your gauge to insure that your cactus will fit into the pot. Gauge is: 6 sc = 1 inch. Or a circle 30 sts around measures 1 3/4 inches in diameter.
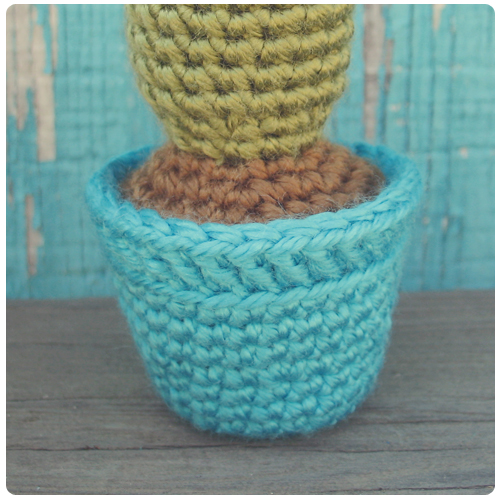
POT
With CE, Ch 2.
rnd 1: 6 sc in 2nd ch from hook. (6)
rnd 2: 2 sc in ea st (12)
rnd 3: [1 sc, 2 sc in next st] rep around (18)
rnd 4: [2 sc, 2 sc in next st] rep around (24)
rnd 5-7 (3 rnds): 1 sc in ea st (24)
rnd 8: [3 sc, 2 sc in next st] rep around (30)
rnd 9-11 (3 rnds): 1 sc in ea st (30)
sl st to join at the end of rnd 11
rnd 12: ch 2 (counts as 1 dc). In back loops only – 1 dc in ea st (30)
invisible join and FO

If you use this free pattern, please consider supporting me by purchasing a pattern from my shop. Your support will help ensure that I’m able to continue making new patterns to share. Thanks for considering! :)
THE TALL ONE
With CA, Ch 2.
rnd 1: 6 sc in 2nd ch from hook. (6)
rnd 2: 2 sc in ea st (12)
rnd 3: [1 sc, 2 sc in next st] rep around (18)
rnd 4-11 (8 rnds): 1 sc in ea st (18)
*insert eyes between rnds 5 & 6 with 3 sts between them*
*use a small scrap of embroidery floss to embroider a mouth between the eyes*
rnd 12: [1 sc, sc2tog] rep around (12)
rnd 13: 1 sc in ea st (12)
*stuff*
With CB:
rnd 14: In front loops only – [1 sc, 2 sc in next st] rep around (18)
rnd 15: [2 sc, 2 sc in next st] rep around (24)
rnd 16: [3 sc, 2 sc in next st] rep around (30)*
* You may not need to complete this round. Keep checking to see if the dirt is wide enough to fit the pot and stop when you’re happy with the fit.
FO
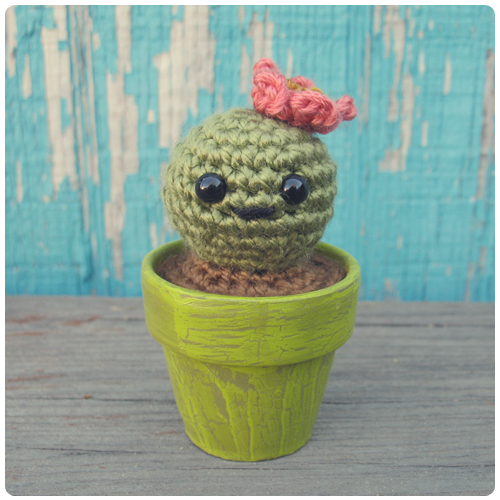
THE STUMPY ONE
With CA, Ch 2.
rnd 1: 6 sc in 2nd ch from hook. (6)
rnd 2: 2 sc in ea st (12)
rnd 3: [1 sc, 2 sc in next st] rep around (18)
rnd 4: [2 sc, 2 sc in next st] rep around (24)
rnd 5-8 (4 rnds): 1 sc in ea st (24)
*insert eyes between rnds 5 & 6 with 3 sts between them*
*use a small scrap of embroidery floss to embroider a mouth between the eyes*
rnd 9: [2 sc, sc2tog] rep around (18)
rnd 10: [1 sc, sc2tog] rep around (12)
*stuff*
With CB:
rnd 11: In front loops only – [1 sc, 2 sc in next st] rep around (18)
rnd 12: [2 sc, 2 sc in next st] rep around (24)
rnd 13: [3 sc, 2 sc in next st] rep around (30)*
* You may not need to complete this round. Keep checking to see if the dirt is wide enough to fit the pot and stop when you’re happy with the fit.
FO
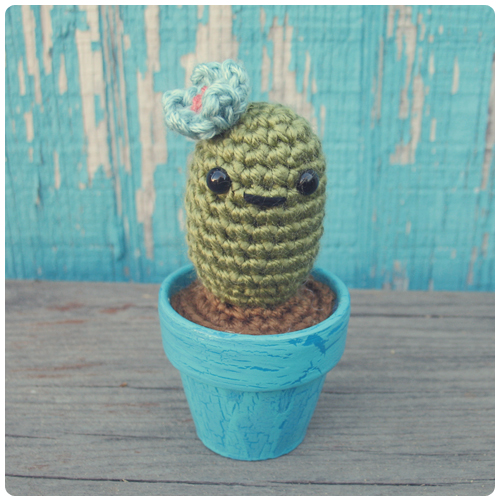
THE WEIRD ONE
With CA, Ch 2.
rnd 1: 6 sc in 2nd ch from hook. (6)
rnd 2: 2 sc in ea st (12)
rnd 3: [1 sc, 2 sc in next st] rep around (18)
rnd 4-6 (3 rnds): 1 sc in ea st (18)
*insert eyes between rnds 3 & 4 with 3 sts between them*
*use a small scrap of embroidery floss to embroider a mouth between the eyes*
With CB:
rnd 7: In front loops only – [2 sc, 2 sc in next st] rep around (24)
rnd 8: [3 sc, 2 sc in next st] rep around (30)*
* You may not need to complete this round. Keep checking to see if the dirt is wide enough to fit the pot and stop when you’re happy with the fit.
FO
*stuff*
Making the top nub:
With CA, Ch 2.
rnd 1: 6 sc in 2nd ch from hook. (6)
rnd 2: 2 sc in ea st (12)
rnd 3-4 (2 rnds): 1 sc in ea st (12)
rnd 5: sc2tog 6 times (6)
*stuff*
Cut a piece of yarn long enough to attach this nub to the top of the first half. Attach using your yarn needle. FO
FLOWER
With CC, ch 5. 1 sc in 5th ch from hook. [ch 3, 1 sc in same ch as previous sc] 4 times.
FO leaving a piece of yarn long enough to attach the flower to the cactus.
With a scrap of CD and your yarn needle, make three french knots in the center of the flower.
FO
Using the piece of CC that you left and your yarn needle, make a couple stitches to attach the flower to the top of the cactus.
FO
ASSEMBLY
If you made a crocheted pot:
Fill the pot with plastic pellets or stuffing. I recommend pellets, they’ll help the bottom stay flatter so it doesn’t tip over. Next, using a piece of CE and your yarn needle, stitch around the edge of the dirt, attaching it to the inside of the pot. I try to line the dirt up with the bottom of the final rnd of the pot so it’s a little bit lower than the top edge.
If you’re using a regular pot:
If your pot has a hole in the bottom of it, you can glue a little blob of CB in to cover/plug the hole. Then, you can fill the pot with stuffing or plastic pellets. Next, using your hot glue gun, make a line of glue all the way around the inside of the pot, just a little bit lower than the top edge. Quickly place the cactus/dirt on top of it and press down for a minute until the glue cools.

You are welcome and encouraged to sell any items you make using this pattern! All I ask in return is that when selling online, please credit Julie King / Gleeful Things & provide a link to www.gleefulthings.com.
You may NOT sell the pattern, distribute it in any form, repost it online, or alter it to claim it as your own (this includes charts & translations to other languages). Copyright © 2010 Julie King / Gleeful Things. All Rights Reserved.


Wonderful! How I am wishing I could crochet. I am in an ornament exchange and these would be perfect.
very cute… have you made these in thread yet? I think I want to try them in thread… I will send a picture if they come out okay :D
I’ve never made them with thread! That will probably be really cute and so so tiny! I look forward to seeing them! :)
Thank you for these patterns, I love them! I have made one tall cactus so far and can’t wait to make the other two types.
You’re welcome! I’m glad you’re enjoying the pattern! You should post a pic of your cacti, I’d love to see! :)
My cactus is happily sitting on my desk at work :)
http://images4.ravelrycache.com/uploads/melliechicken/57857351/IMAG0799_medium2.jpg
I LOVE cacti! These are super cute. Thank you for sharing!
Thank you! I’m glad you like! I heart cacti too! :)
Hey!
Thanks for posting this pattern, I made the tall one for my husband. He’s from Phoenix AZ and sometimes gets homesick, this will cheer him up a little! lol
Pics on Ravelry here if you’d like to see them!
http://www.ravelry.com/projects/Ch1x/tiny-cacti
Chicks
aw it’s cute!! Thanks for sharing the picture with me! :)
Hello Julie,
thank you for this pattern! I did not follow it but the pictures inspired me to wing a simple cactus:
http://blog.tinalangheinrich.de/2011/10/09/week-40-this-is-forever/
I sure will make some more.
BTW, I love your entire blog and I am very happy that I came acroos it when searching for the cacti.
Greetings from Germany!
Tina
Thank you so much for the cacti pattern. I can’t wait to crochet these adorable little guys. I have a friend who grows cacti and it’s going to make an awesome Christmas gift. You are so kind to share your designs.
Julie, Thanks so much for sharing these patterns.
I LOVE these! I’m working on the pot right now and I’m a little confused with the 4th row.
rnd 3: [1 sc, 2 sc in next st] rep around (18)
rnd 4: [2 sc, 2 sc in next st] rep around (24)
If there are 2 sc in the first and then 2 sc in the second repeated, I wasn’t sure how that made 24 stitches and if there is something I’m missing.
Please help!
Emily I’m sure you’ve already worked it out, but I would read round 4 as 1 sc in each of the next 2 stitches, then 2 sc in the stitch after that :)
Very cute cacti. I might need to make a few for my Mum. She kills all plants. I wonder if I could figure out a way to join the dirt so I could do multiple cacti in one bigger pot. hmmmm.
I just finished making my cactus!
im just a beginner, so it did’nt turn out as neat as yours, but i still love it! =D
Gleeful is right! So fun! Found via FreeCrochet.com just made me smile all over – I’m from Texas living in Maryland so a little bit of home is always fun! Thanks for sharing your talents! I hope I can make a couple, crocheting is still new to me – flat things ok, non-flat…challenge! This will be a fun challenge!
I have a friend who loves cacti, I will be making these soom for this special person
Ilove these. they are so cute, I laughed harder with each picture of the cacti. I intend to make them all and have a waterless cacti garden!
PS: You are so talented. Thank you so much for sharing you wonderful gift.
These are absolutely adorable. Thank you so much for sharing this pattern. I want to make these for a friend in Arizona who is well-off and hard to buy gifts for. I am on disability and can use up yarn scraps for these and send her a cute gift!!
These are so adorable. I can’t wait to try and crochet these.
Adorable. I have a Cactus garden and will ad these to it as soon as the weather has changed. An the Octo-ma-pus, to my collection of Octopus. Thanks Judy
I think the cactis plants are very cute. I’m going to try them.!
Adorable. I have a Cactus garden and will ad these to it as soon as the weather has changed. And the Octo-ma-pus, to my collection of Octopus. Thanks Judy
I love the little cacti, I am going to make some of them, I think they would be a cute thing to give to my sister, she is having a lot of problems, and they would be a pickup for her.
thanks for sharing your pattern
I love your Cacti Pattern this would be great for giving to cacti growing people and be great as gifts but i would not sure the pattern!
These are sooo cute. I bought ‘many’ of these small pots a couple years back. I make “Hair Pots” . I disassemble small silk flowers, and attach them to hairpins. I put 5 in one of the pots(it takes 4/5 to hold up a twist) I have sold many of these hair pots at craft fairs,ect. These are just so cute. I also make the mini cupcake pot. I hot glue a button to the side of the pot, and don’t glue down the “frosting” on the cupcake so I can fill the pot with small candies. They are a BIG HIT<3 Thanks for this added joy. I will give you credit for the cacti pattern…I always give credit where due.
Very nice Thank you for pattern,i could not find it anywhere,the translation Washington horrible if you need help in the translationi will help you
these are soooo cute I am going to attempt making one. I’m new to crocheting but I want to try fun things to learn, so I am definately going to bookmark your pattern & try it. How can you not smile when you look at one of these? they are so cute :)
I teach crochet at a rec center for seniors. When I saw these I thought they would be perfect for them. I’m always looking for something small. I made one using googly eyes instead of small black ones, really turned out cute. ty Gloria
I just made one of the tall ones… It is SO CUTE! Thank you for a WONDERFUL tute! Xo
Beautiful, and of course i will buy a patterns
This is kind of a silly question, but I’m a beginner still and I’m having trouble getting my stitches to come out in the proper amount on the tall one. I chained two, made a slip stitch, then chained one to go to round one; how many stitches should I have after I complete the six single crochet? I just don’t know how I should be counting the slip stitch and chain that come at the end of the round. These are super cute, so I want to get them right. Thanks for the pattern!
I love amigurumis
I love these!! :) I’m making a collection of them for spring/summer decorations for my living room! All your patterns are fab, & I have bought a few!! :D
You are absolutely inspiring! Thank you for the patterns and for all of your other beautiful and adorable patterns and projects. These little cacti are adorable!