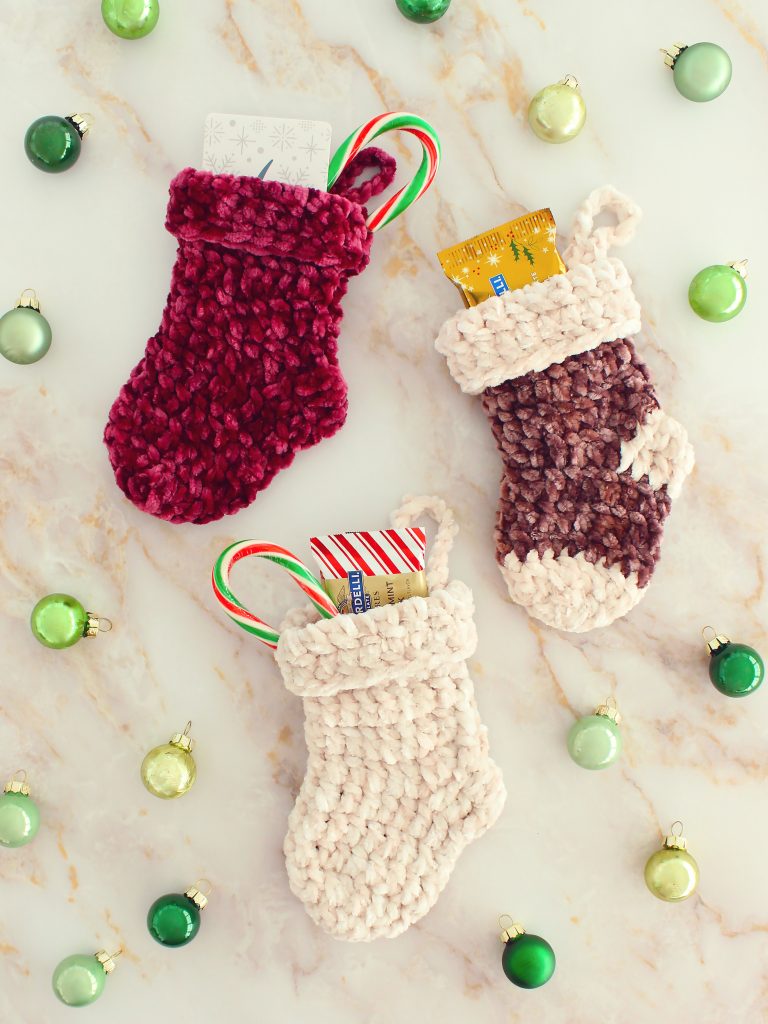
Velvet Mini Christmas Stockings Free Crochet Pattern
Do you ever find yourself wanting to crochet something for Christmas but don’t want to commit to a large project? I get it! The holidays are a busy time and it can be hard to find the time to do anything extra. Or, maybe you feel the urge to make something new but you already have plenty of Christmas decorations.
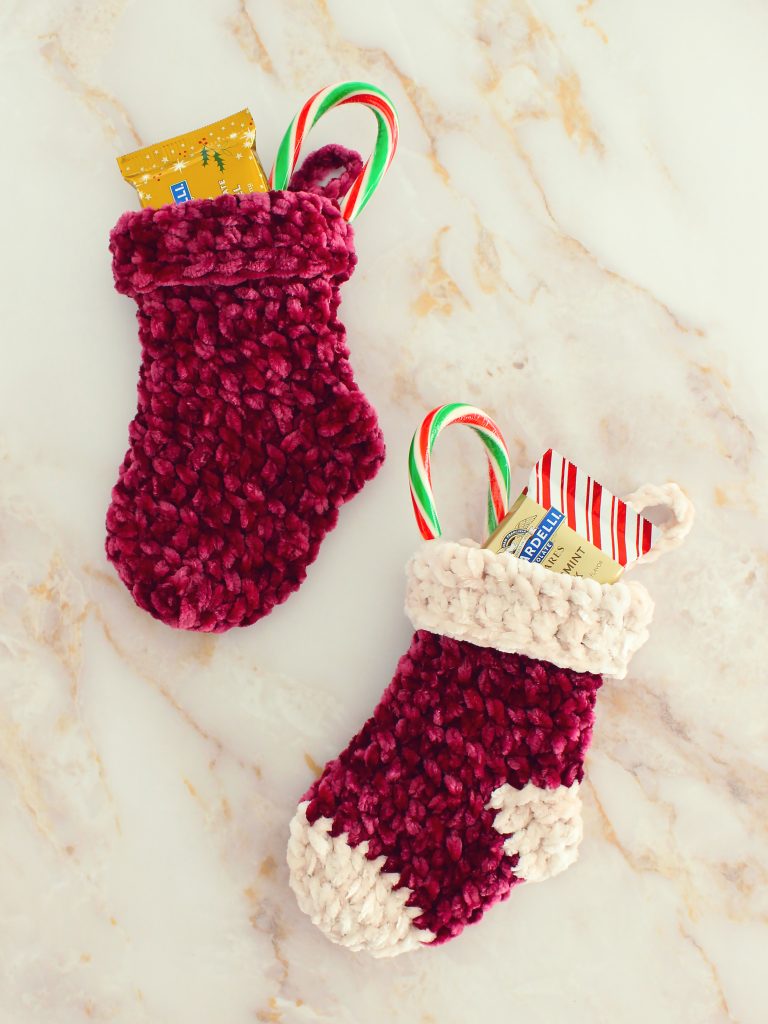
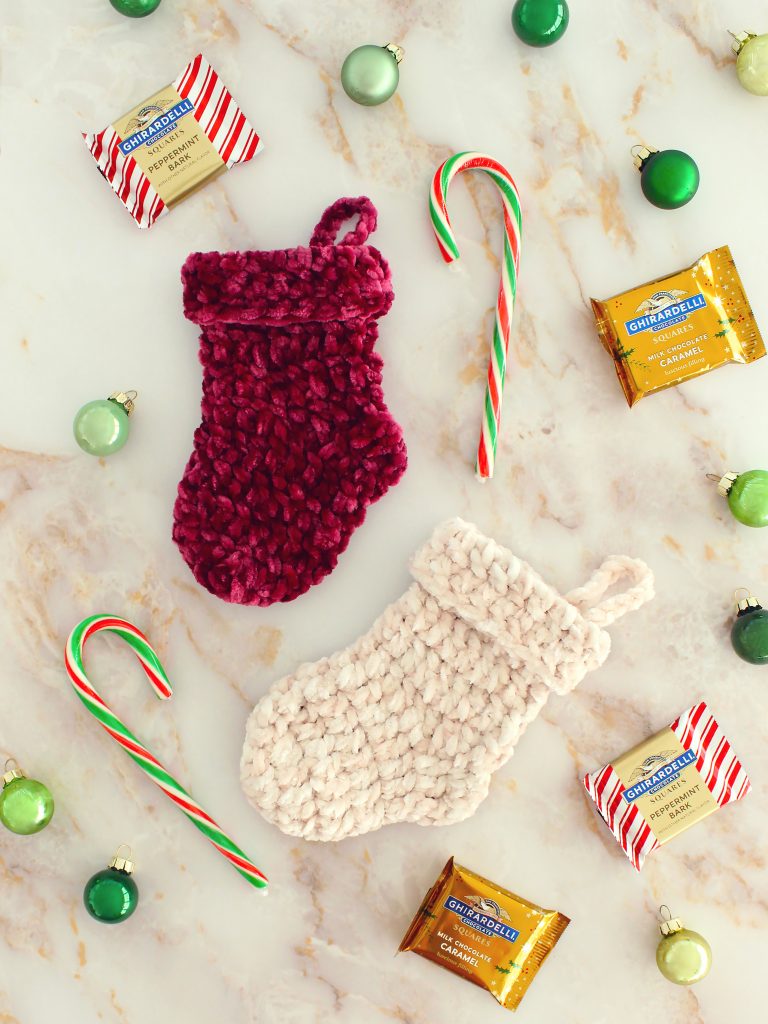
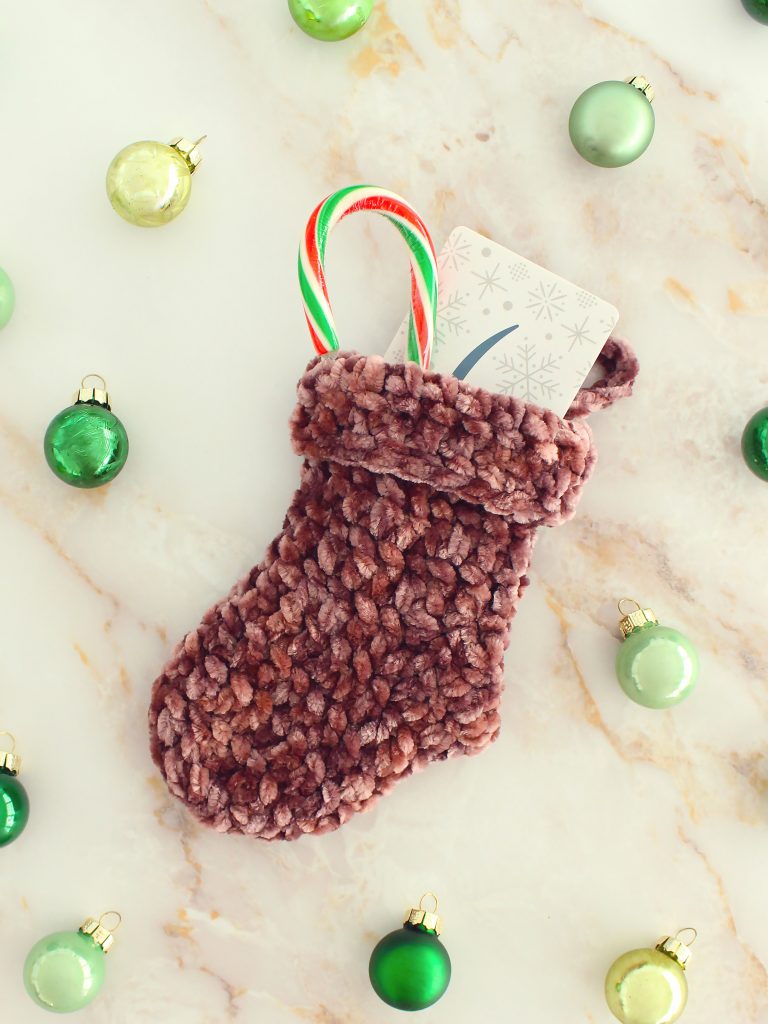
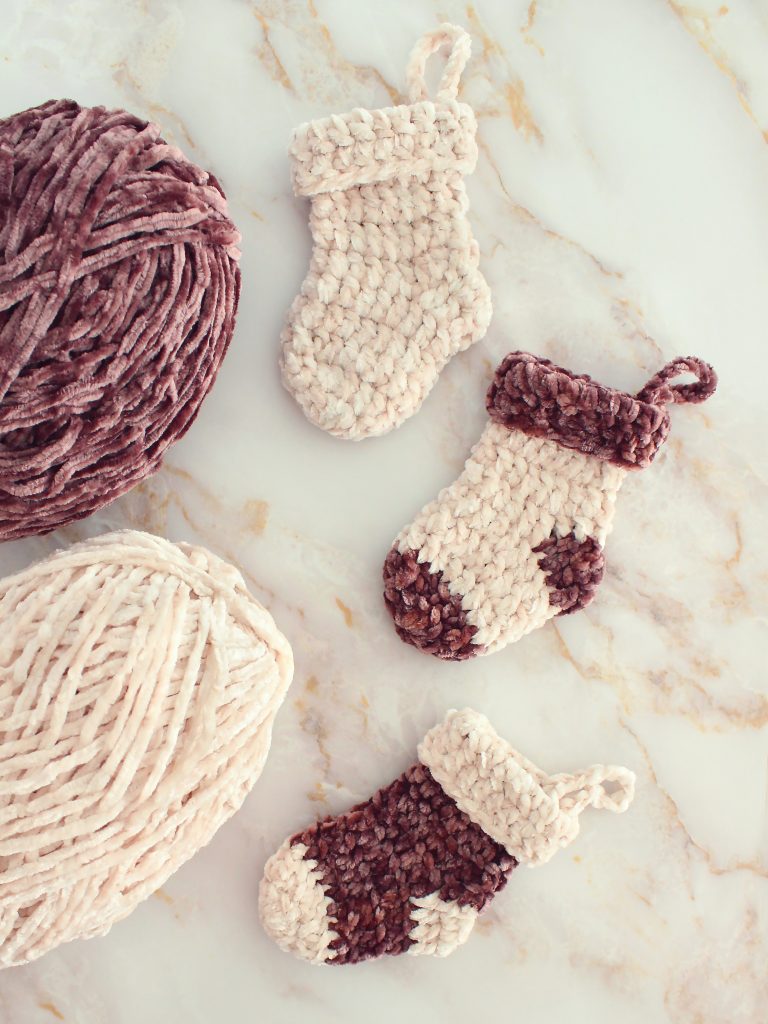
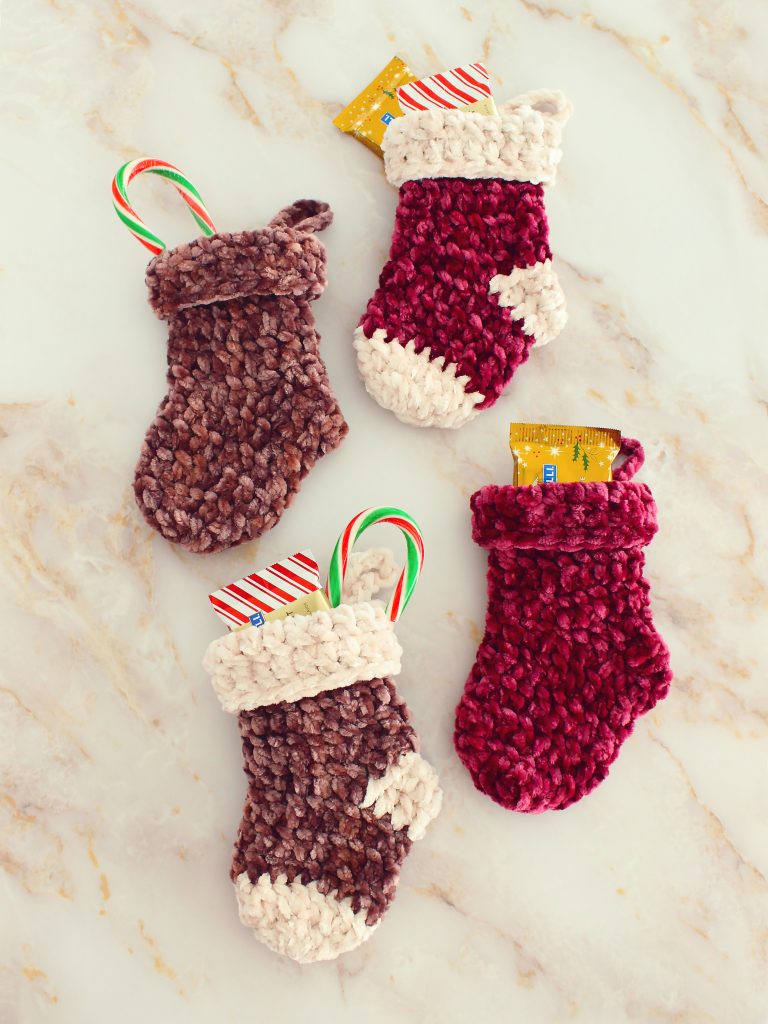
These Velvet Mini Stockings are the perfect project for you! Being so small, they’re quick to make. Not much commitment at all and you’ll promptly get that sense of satisfaction from finishing a project! And the best part is, these tiny stockings have a variety of uses so if you’re not wanting to add more decorations to your space, they also make nice gifts.
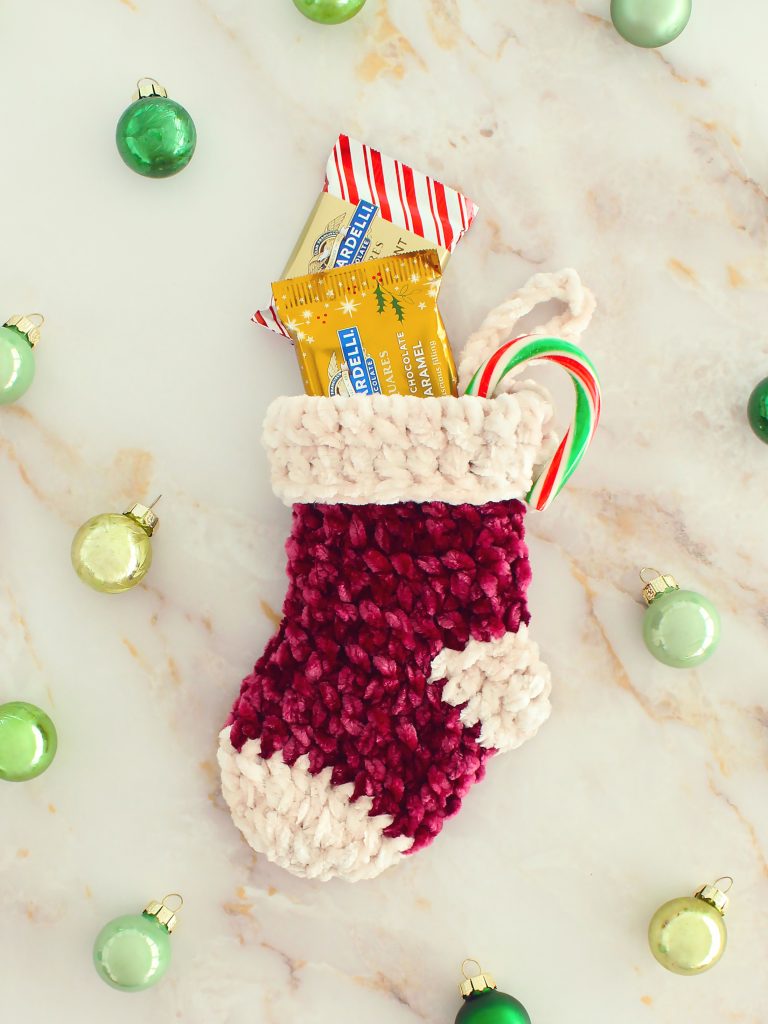
Personally, I love to use them as gifts for those people that you just want to get a little something for. Have you ever wanted to give someone a gift card but felt like you needed something to go with it? These stockings fit a gift card perfectly!!
And I think we all have people in our lives that we don’t really exchange gifts with (neighbors, coworkers, the mail carrier, etc.) but want to give something. You could simply fill these with candy and other small goodies to give out in those situations. It’s a small gift, but it’s handmade so it will feel extra special!
Disclosure: This post contains affiliate links. If you click and make a purchase, I will receive a small commission, at no extra cost to you. This, along with the ads shown on this blog, help to ensure that I’m able to continue posting free patterns and tutorials for you to enjoy. Thank you for your support!
Why You’ll Love These Mini Stockings!
- Quick & Easy – Made in just 12 rounds of basic double crochets with a very simple heel design! I’ve even included photos to help you through the heel part, if needed.
- Scrap Saver – You’ll only need about 28 yards of yarn per stocking so this is a great way to use up left overs from other projects.
- Cost Effective – One skein of Bernat Velvet is enough to make 11 of these mini stockings so if you need to make a bunch for gifts or to sell at a craft fair, it’s a good value!
- Effortless Yarn Substitution – Velvet yarn is a great way to make your stockings feel a little fancy but you can really use just about any bulky yarn you prefer for this project.
- Variety of Uses – Use them as gifts or use them as decorations, it’s up to you!
I really cannot get enough of velvet yarn and I hope you agree! It’s such an effortless way to make any basic crochet project seem fancier, which is especially awesome for holiday decor or gifts. And how amazing is it that you can get 11 of these mini stockings out of one skein of Bernat Velvet?! If you sell at craft fairs, that will give you a really low cost per item!
Yarn
#5 bulky weight yarn: Approximately 28 yards of Bernat Velvet in Burgundy Plum for a single color mini stocking. Or, approximately 14 yards each of Bernat Velvet in Sandy Cream (A) and Mocha (B) for a two-color mini stocking.
Yarn Substitute Ideas
- Bernat Crushed Velvet – If you prefer a slightly tonal yarn that isn’t a solid color, this is perfect!
- Premier Retro Velvet, Yarn Bee Velvety Smooth, Paintbox Yarns Chenille – These are all very similar to Bernat Velvet, just with different colors available.
Tips For Working With Velvet Yarn
Velvet yarn is so unique, I feel like there’s a little bit of a learning curve with it. Before you start this project, be sure to check out these tips I shared on how to make working with it a little easier.
Download The Pattern
You can find the FREE pattern by scrolling down. A print-friendly, ad-free PDF of this pattern is also available for a small fee. If you enjoy my patterns, please consider purchasing the PDF – your support is greatly appreciated and will help me keep the new patterns coming! :)
Supplies
- US Size J/10 (6mm) crochet hook or size needed to obtain gauge
- yarn needle
- scissors
Difficulty
Easy
While these stockings may look fancy because they use velvet yarn, the are actually pretty simple. Do you know how to double crochet? If so, you can make these!
Gauge
6 dc and 3 rows = 2”
Gauge is not super critical for this project but if yours is different than mine, just know that your stocking will be a different size. Which is totally fine! :)
Finished Measurements
6.5 inches tall, 7 inches around
How to Adjust Size
The easiest way to adjust the size of your finished stocking is to use a larger or smaller yarn, along with a larger or smaller hook. If you use a small yarn & hook, your stocking will be even more mini than mine!
Abbreviations
- ch(s) – chain(s)
- dc – double crochet
- st(s) – stitch(es)
- yo – yarn over
- dc3tog – double crochet 3 together (decrease)
Special Stitches
dc3tog – [yo & insert hook into next st, yo & draw up a loop, yo & draw through 2 loops] 3 times, yo & draw through all 4 loops on hook.
Terms Of Use
You are welcome to sell any items you make using this pattern, in small quantities. Mass production is prohibited. When selling online, please credit Julie King / Gleeful Things by linking to www.gleefulthings.com or tagging @gleefulthings. You may NOT sell or distribute the pattern itself in any form, alter it to claim it as your own, post it online, or create a video demonstrating the pattern.
Notes
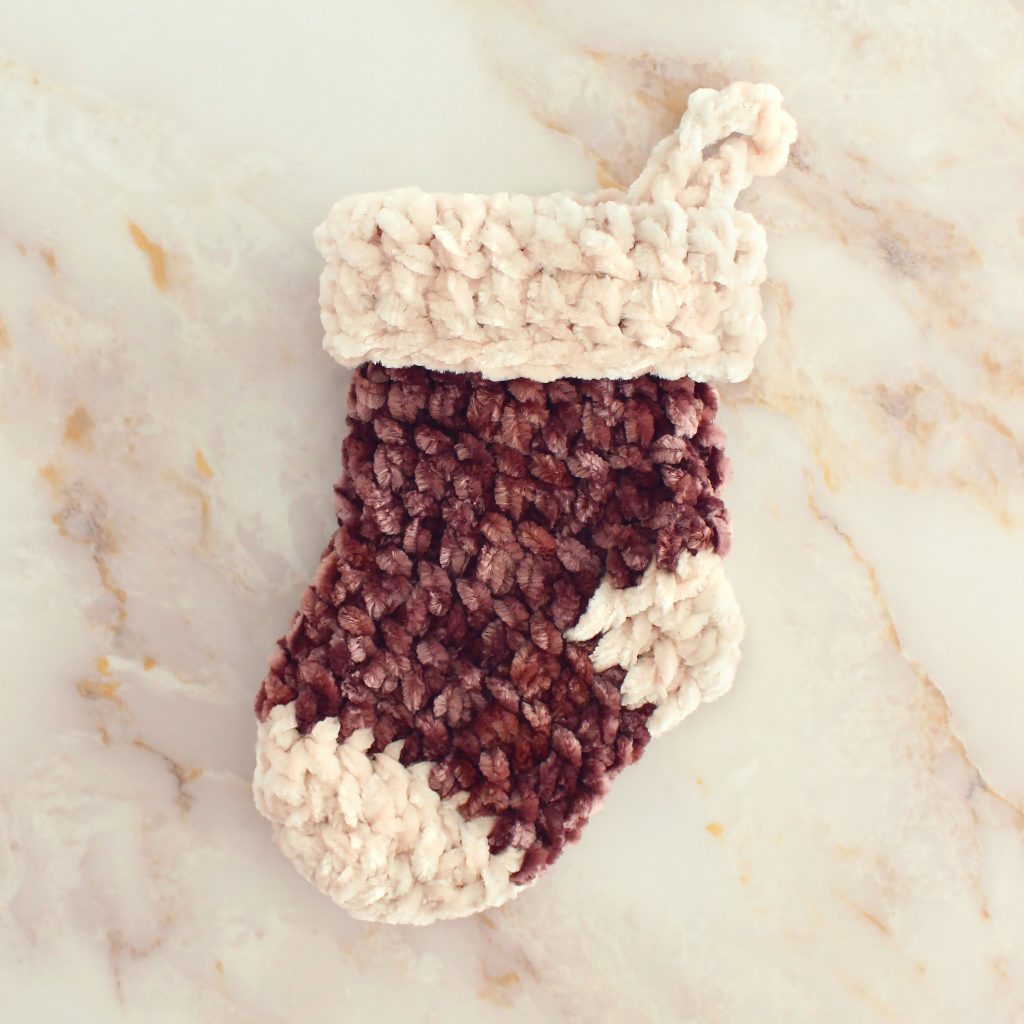
- Stocking is worked from the toe up, in joined rounds with the exception of the heel, which is made in two easy rows. After the heel, you’ll continue working in joined rounds.
- Ch 2 at beginning of rounds/rows always counts as 1 dc.
- If you have any trouble with the heel, click here for a photo tutorial.

Single Color Mini Stocking Instructions
Round 1: Make a magic ring & ch 2 (counts as 1 dc now and throughout), 11 dc in ring, sl st to join to 2nd ch – 12 dc.
Round 2: Ch 2, 1 dc in same st, 1 dc in next st, *2 dc in next st, 1 dc in next st; repeat from * around, sl st to join to 2nd ch – 18 dc.
Round 3 – 5: Ch 2, 1 dc in each st around,sl st to join to 2nd ch – 18 dc.
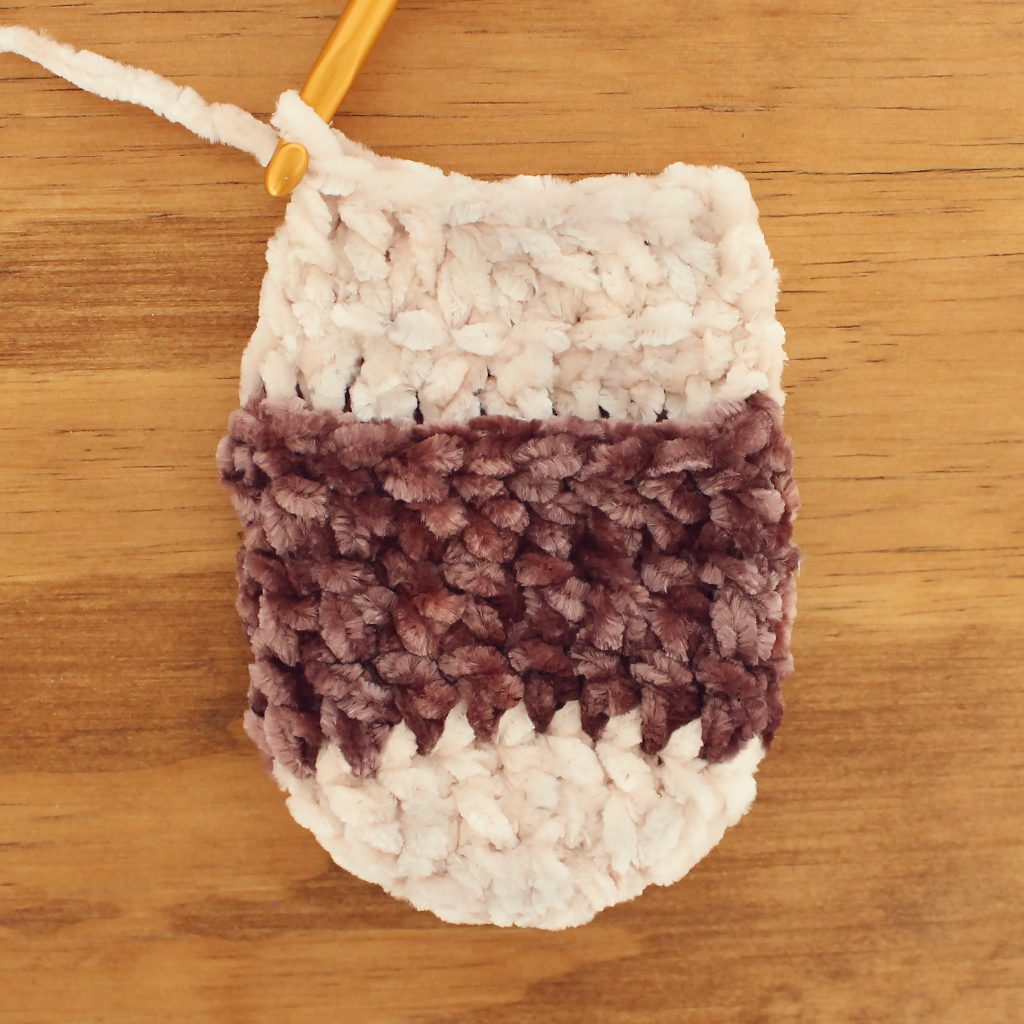
Heel Row 1: Ch 2, 1 dc in each of the next 8 sts – 9 dc.
Heel Row 2: Ch 2 & turn, 1 dc in each of the next 2 sts, dc3tog, 1 dc in each of the next 3 sts, invisible join to 2nd ch, use yarn needle to stitch heel closed and fasten off – 6 dc + 1 dc3tog.
Need help making the heel? Click here for a photo tutorial.
Round 6: Join yarn with ach 2 in same st as invisible join, work 4 dc evenly along the 2 heel rows, (now working in round 5) 1 dc in each of the next 9 sts, work 4 dc evenly along the 2 heel rows, sl st to join to 2nd ch – 18 dc.
Round 7 – 10: Ch 2, 1 dc in each st around,sl st to join to 2nd ch – 18 dc.
Round 11: Ch 2 & turn, 1 dc in same st, 1 dc in each of the next 8 sts, 2 dc in next st, 1 dc in each of the next 8 sts, sl st to join to 2nd ch – 20 dc.
Round 12: Ch 2, 1 dc in each st around, invisible join to 2nd ch – 20 dc.
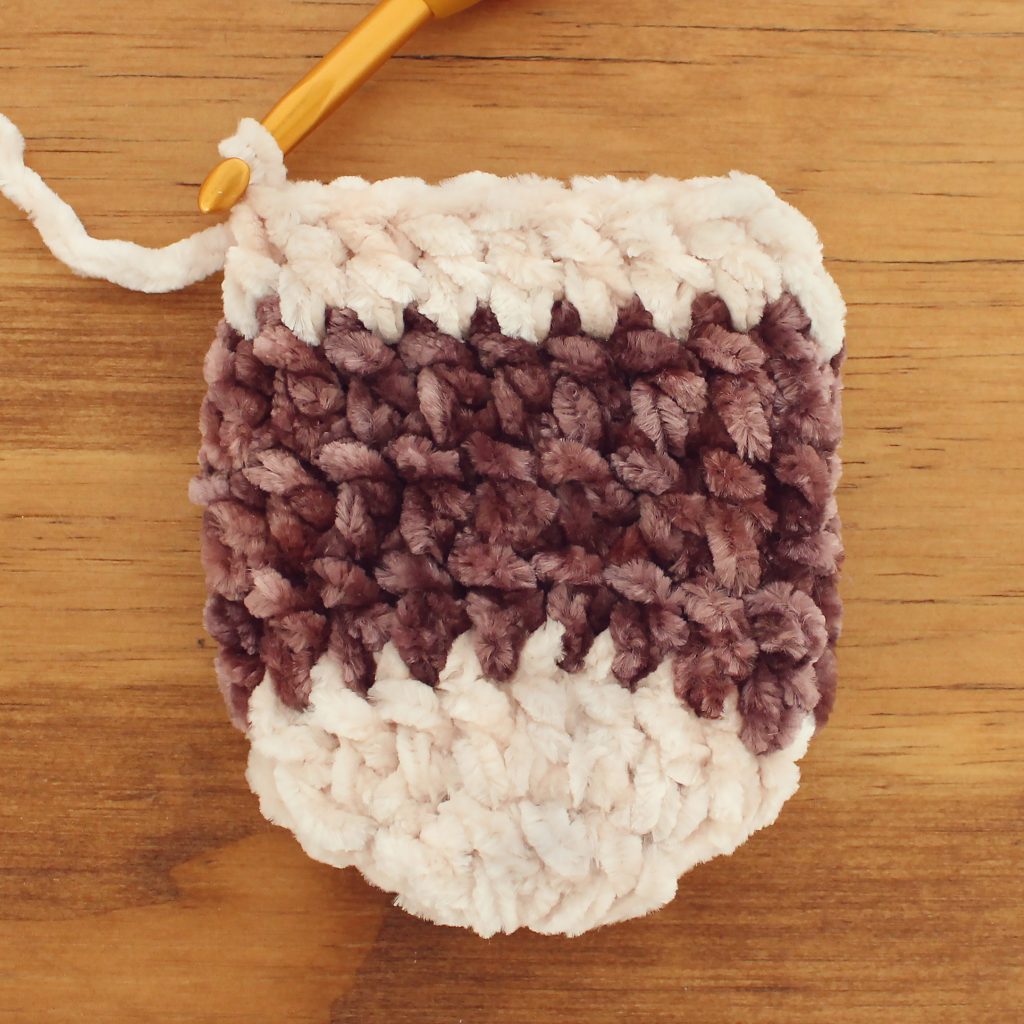
Two Color Mini Stocking Instructions
Round 1: With A, make a magic ring & ch 2 (counts as 1 dc now and throughout), 11 dc in ring, sl st to join to 2nd ch – 12 dc.
Round 2: Ch 2, 1 dc in same st, 1 dc in next st, *2 dc in next st, 1 dc in next st; repeat from * around, invisible join to 2nd ch and fasten off A – 18 dc.
Round 3: Join B with ach 2 in same st as invisible join, 1 dc in each st around,sl st to join to 2nd ch – 18 dc.
Round 4: Ch 2, 1 dc in each st around,sl st to join to 2nd ch – 18 dc.
Round 5: Ch 2, 1 dc in each st around,invisible join to 2nd ch and fasten off B – 18 dc.
Heel Row 1: Join A with ach 2 in same st as invisible join, 1 dc in each of the next 8 sts – 9 dc.
Heel Row 2: Ch 2 & turn, 1 dc in each of the next 2 sts, dc3tog, 1 dc in each of the next 3 sts, invisible join to 2nd ch, use yarn needle to stitch heel closed and fasten off A – 6 dc + 1 dc3tog.
Need help making the heel? Click here for a photo tutorial.
Round 6: Join B with ach 2 in same st as invisible join, work 4 dc evenly along the 2 heel rows, (now working in round 5) 1 dc in each of the next 9 sts, work 4 dc evenly along the 2 heel rows, sl st to join to 2nd ch – 18 dc.
Round 7 – 8: Ch 2, 1 dc in each st around,sl st to join to 2nd ch – 18 dc.
Round 9: Ch 2, 1 dc in each st around, invisible join to 2nd ch and fasten off B – 18 dc.
Round 10: Join A with ach 2 in same st as invisible join, 1 dc in each st around,sl st to join to 2nd ch – 18 dc.
Round 11: Ch 2 & turn, 1 dc in same st, 1 dc in each of the next 8 sts, 2 dc in next st, 1 dc in each of the next 8 sts, sl st to join to 2nd ch – 20 dc.
Round 12: Ch 2, 1 dc in each st around,invisible join to 2nd ch and fasten off A – 20 dc.
Finishing
Fold the last two rounds down to create a cuff.
Loop for hanging:
Ch 16, sl st to join to 1st ch to form a loop, cut yarn leaving a tail. Use your yarn needle and the tail you left to attach the loop to the inside of the top of the stocking.
Helpful Photos
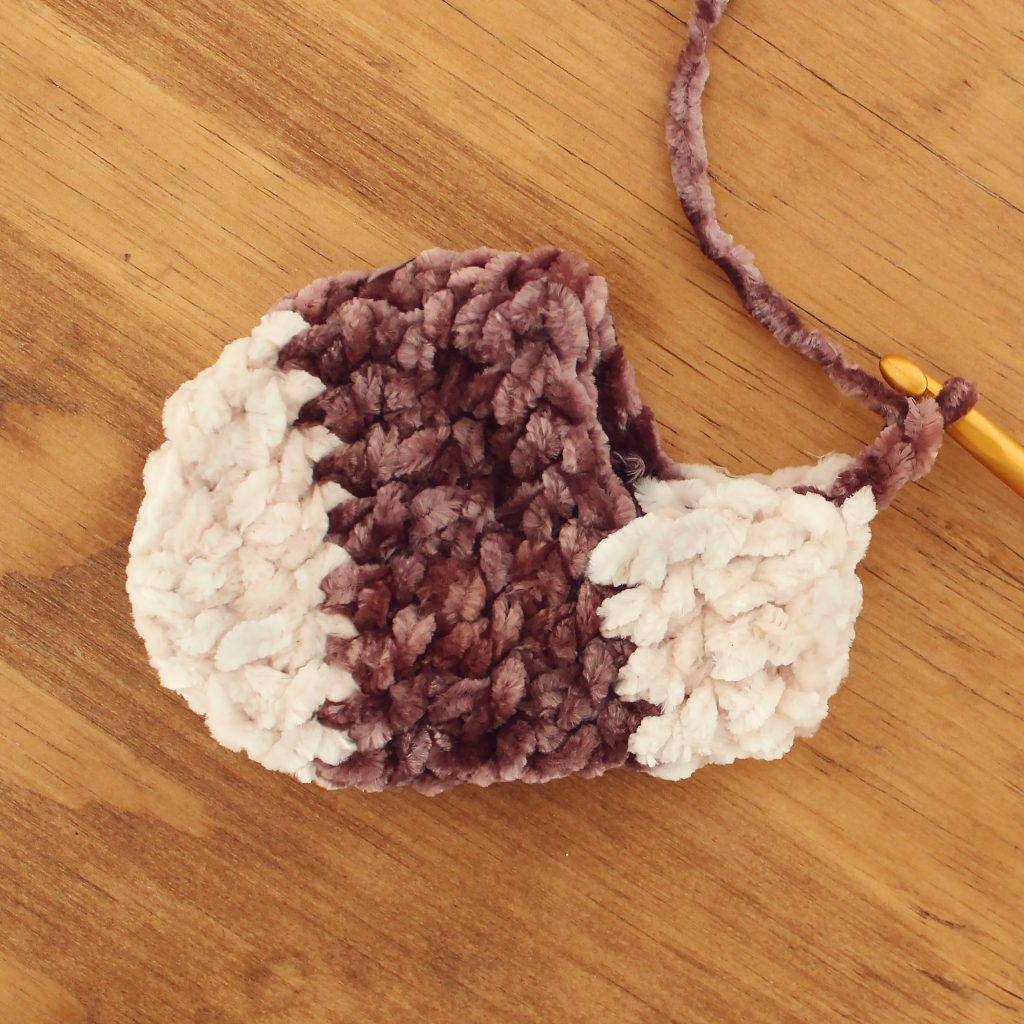
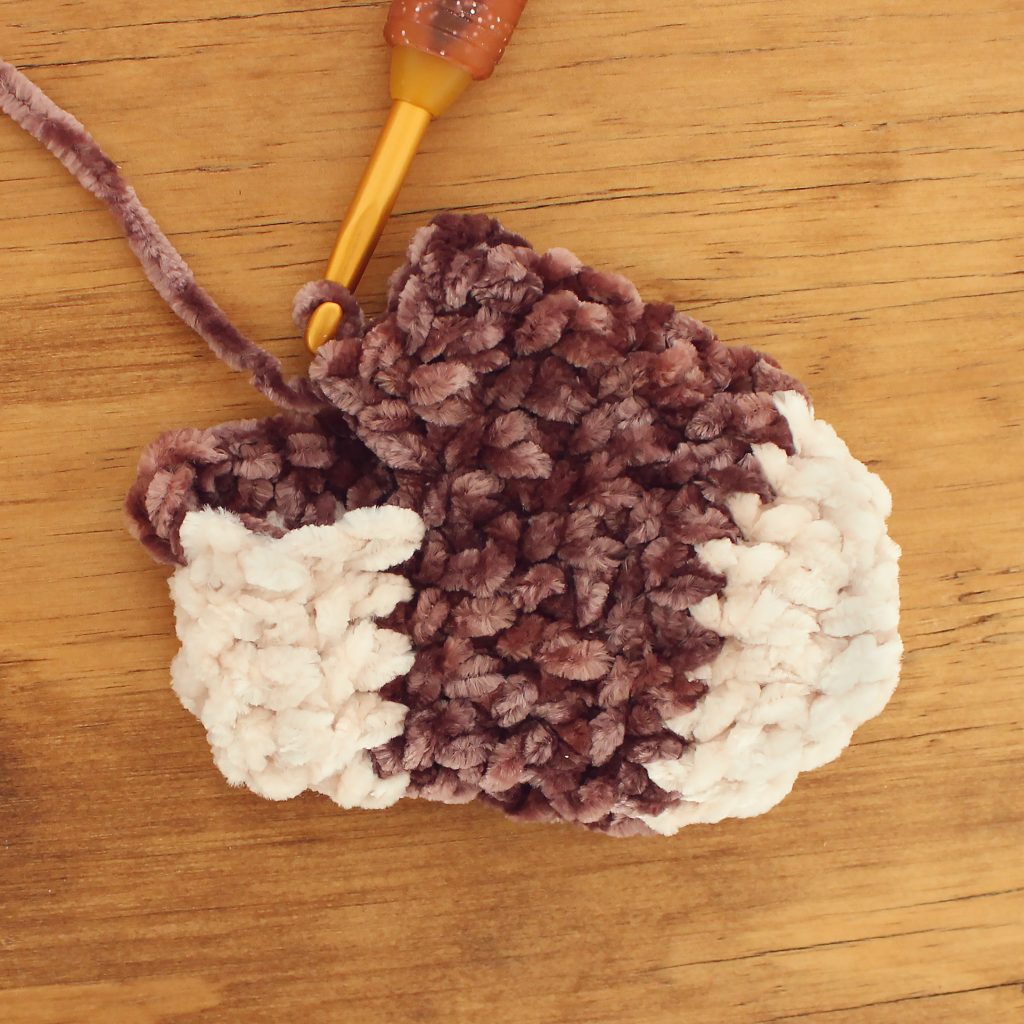
How the heel is made:
The heel begins where you left off at the end of round 5. Instead of working in rounds, you’ll crochet two rows that go half way across the stocking. The first photo shows heel row 1 and the second photo shows heel row 2.
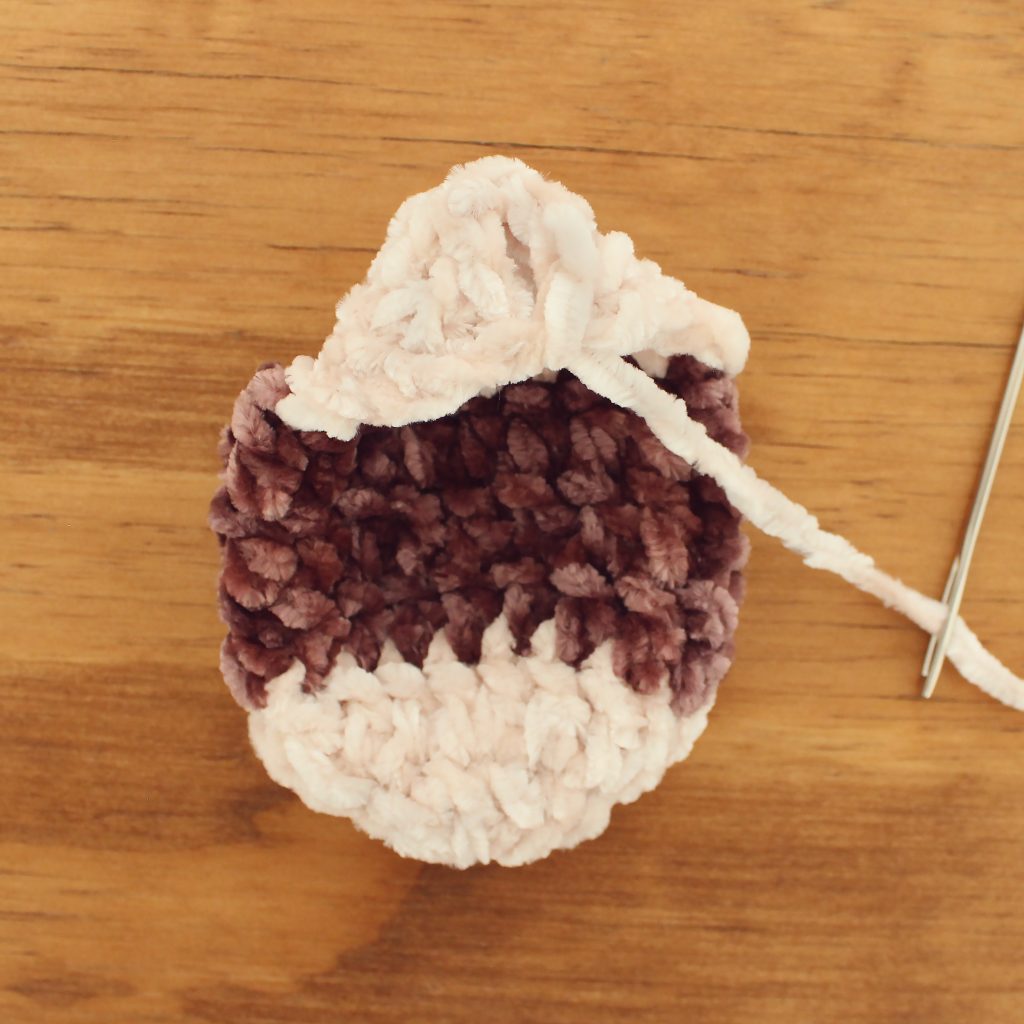
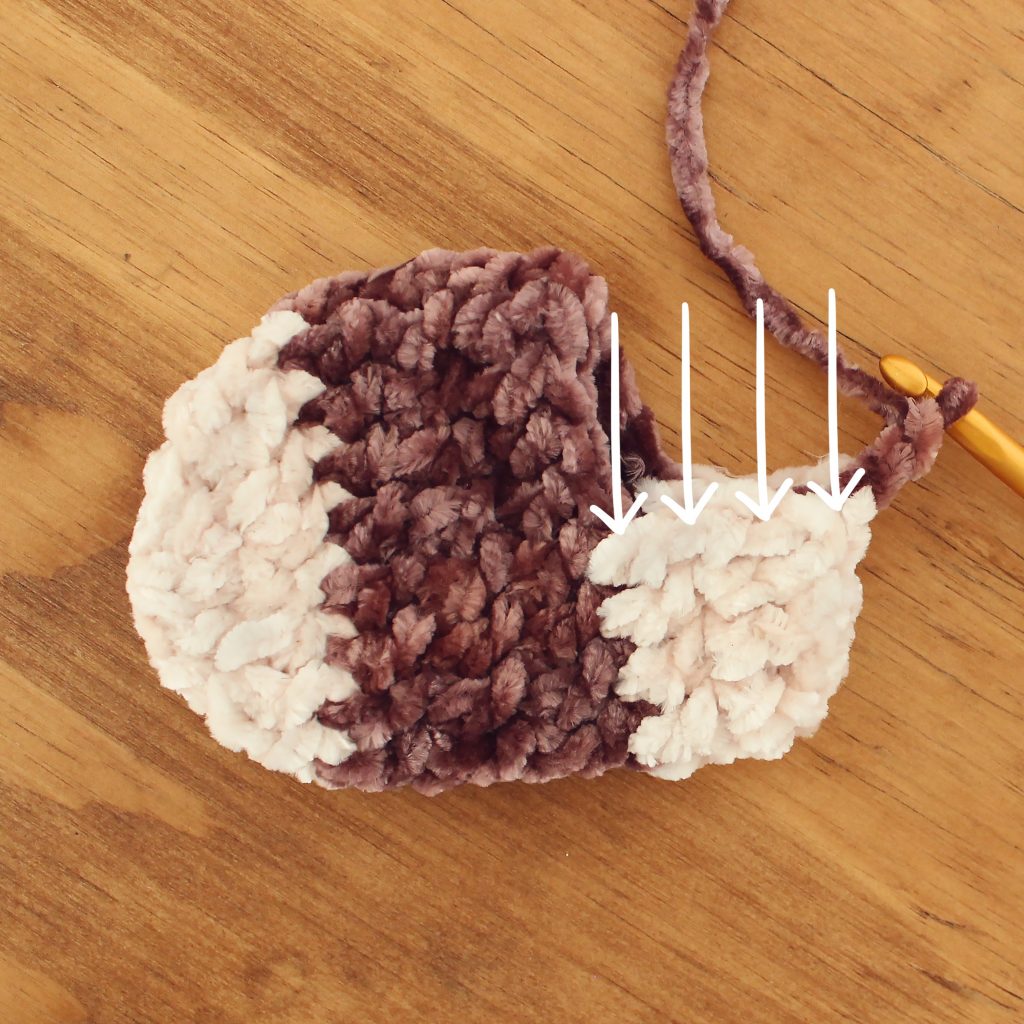
At the end of heel row 2, cut your yarn and use your yarn needle to invisible join to the beginning of that row.
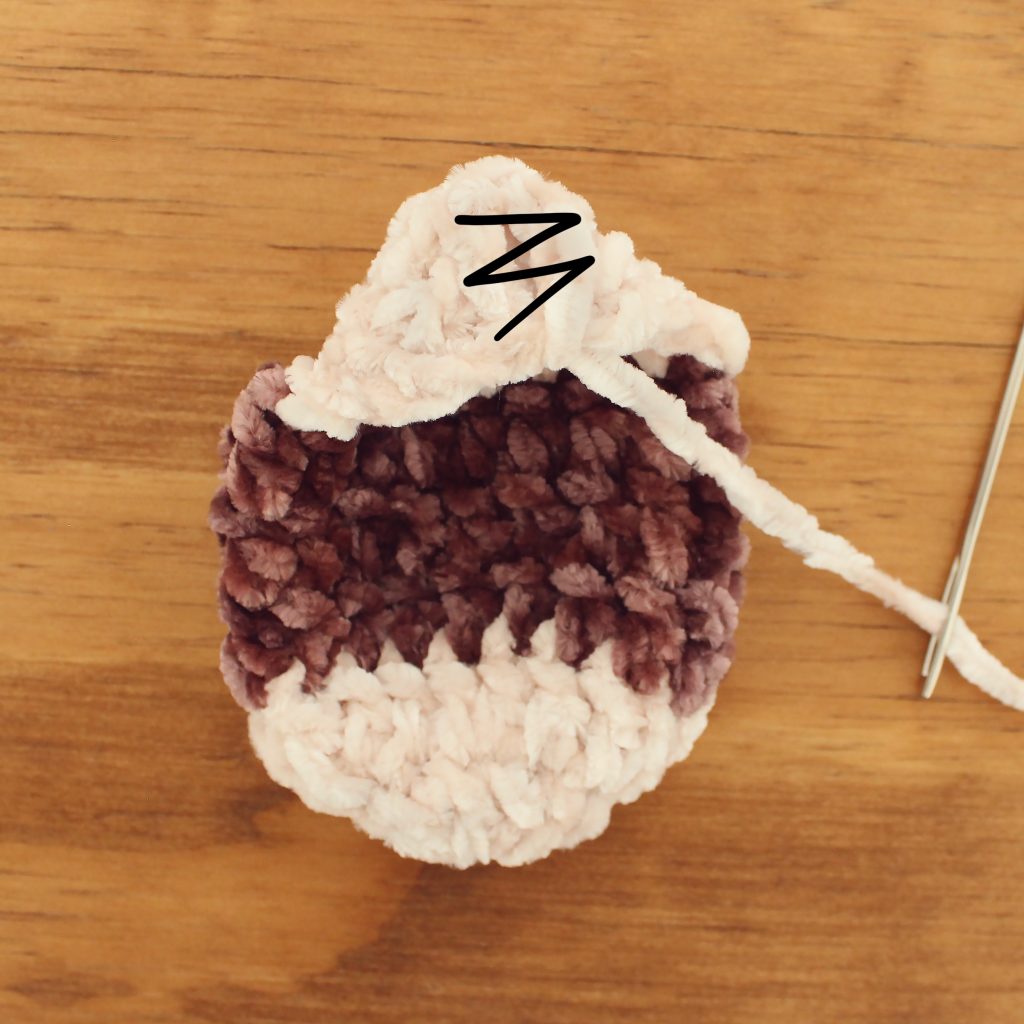
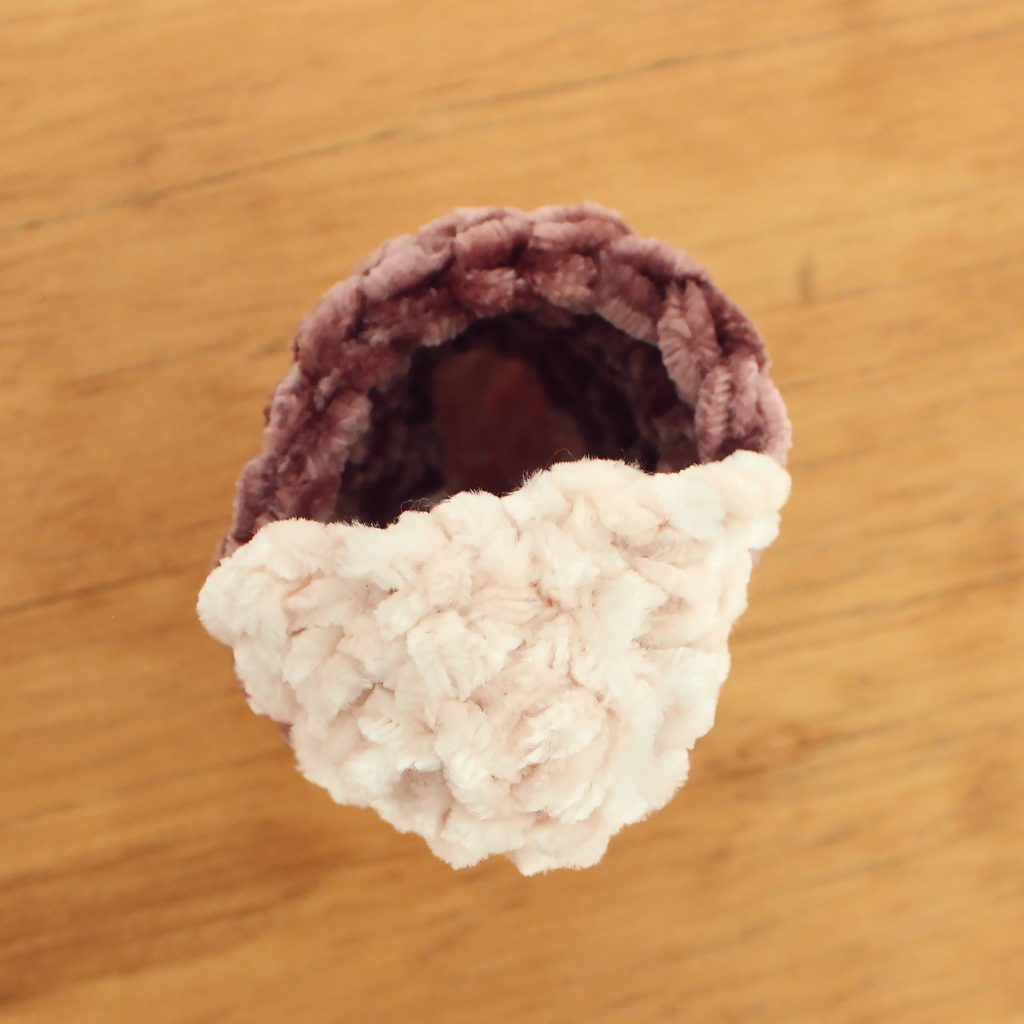
Then, use that yarn to stitch up the little hole that is left along the top of heel row 2 as shown in the first photo. This forms the back of the heel. The second photo shows the back of the heel after being stitched up and then flipped right side out.
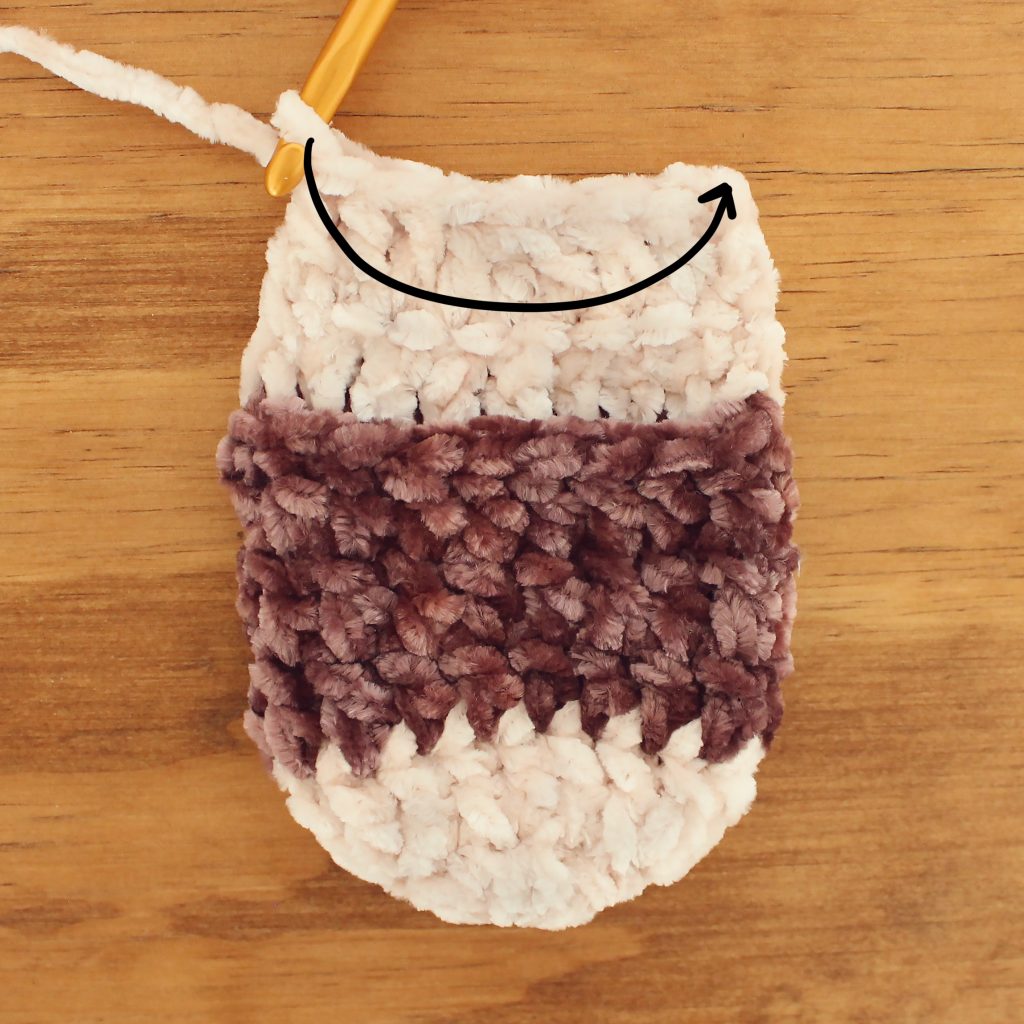
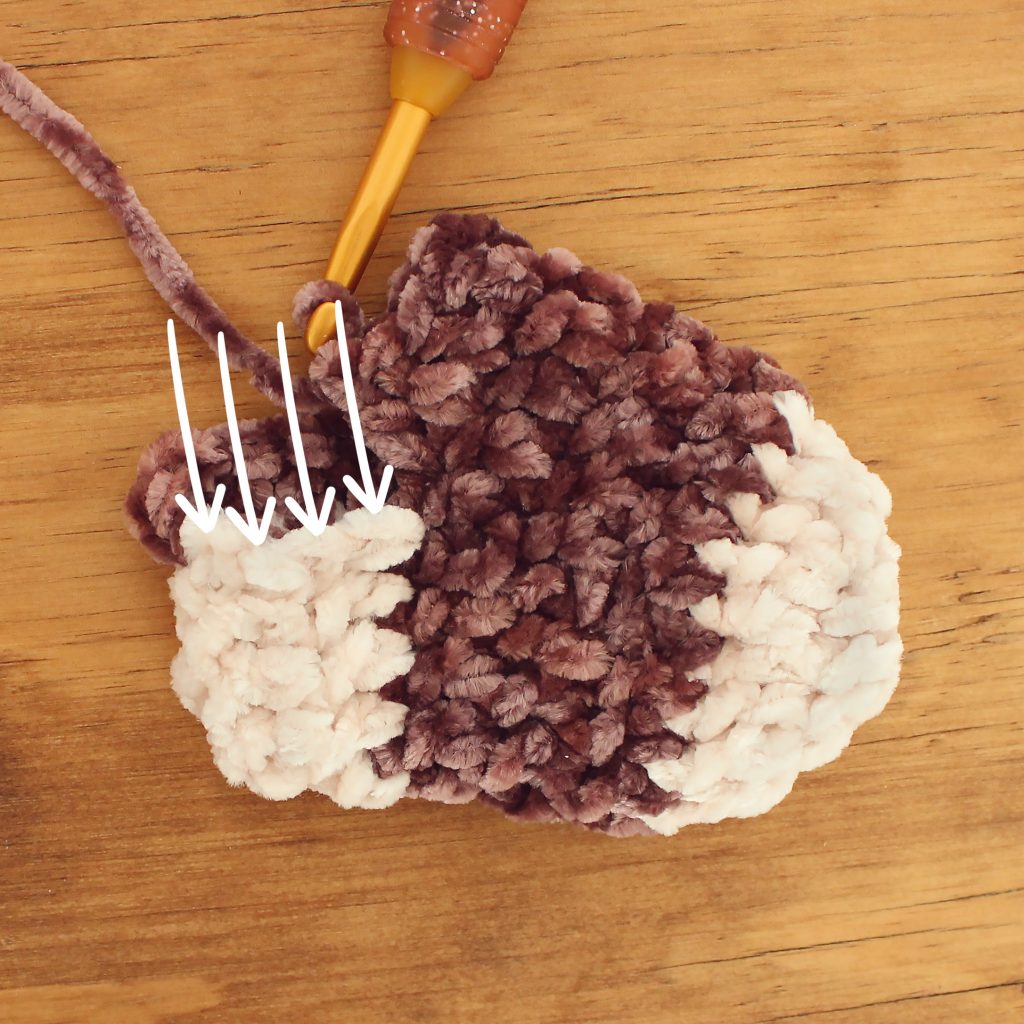
How to continue after the heel (round 6):
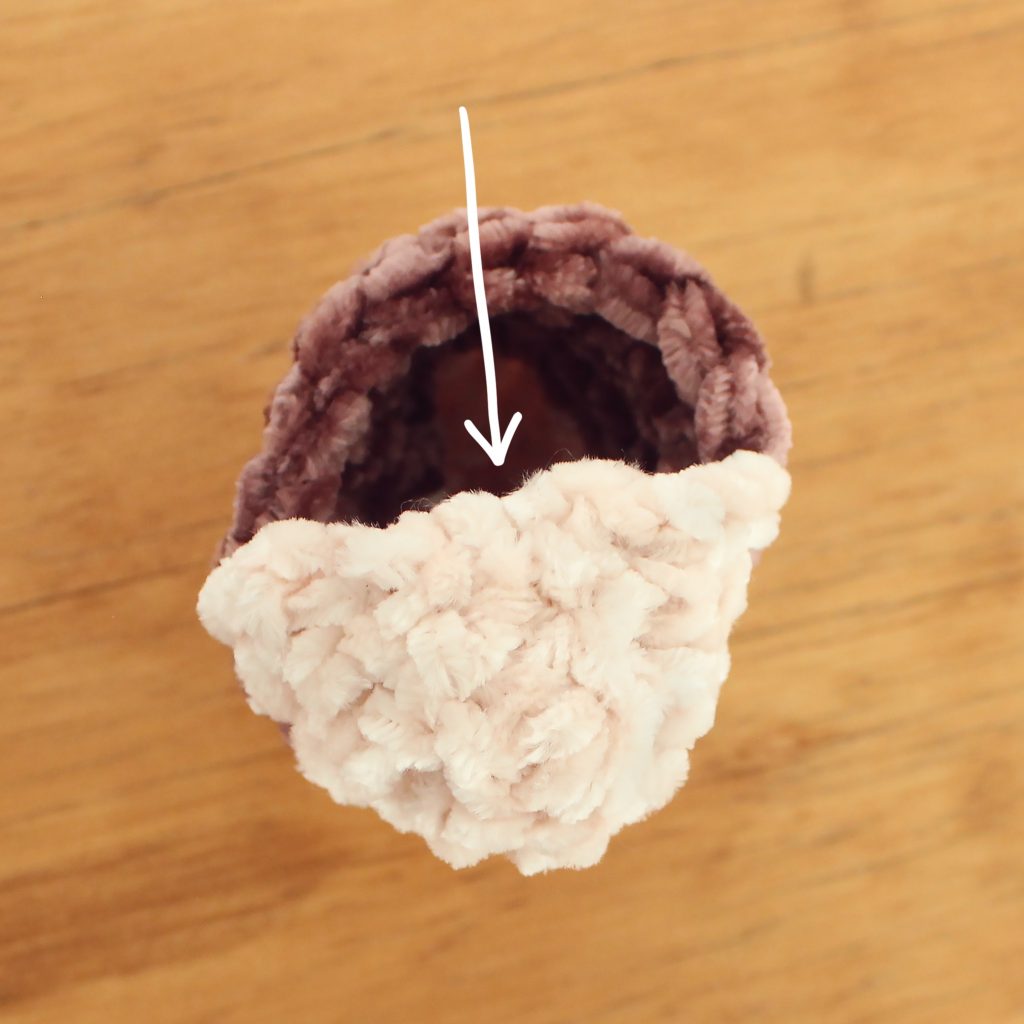
Join your yarn at the back of the heel with a ch 2. This is the same spot that you made your invisible join.
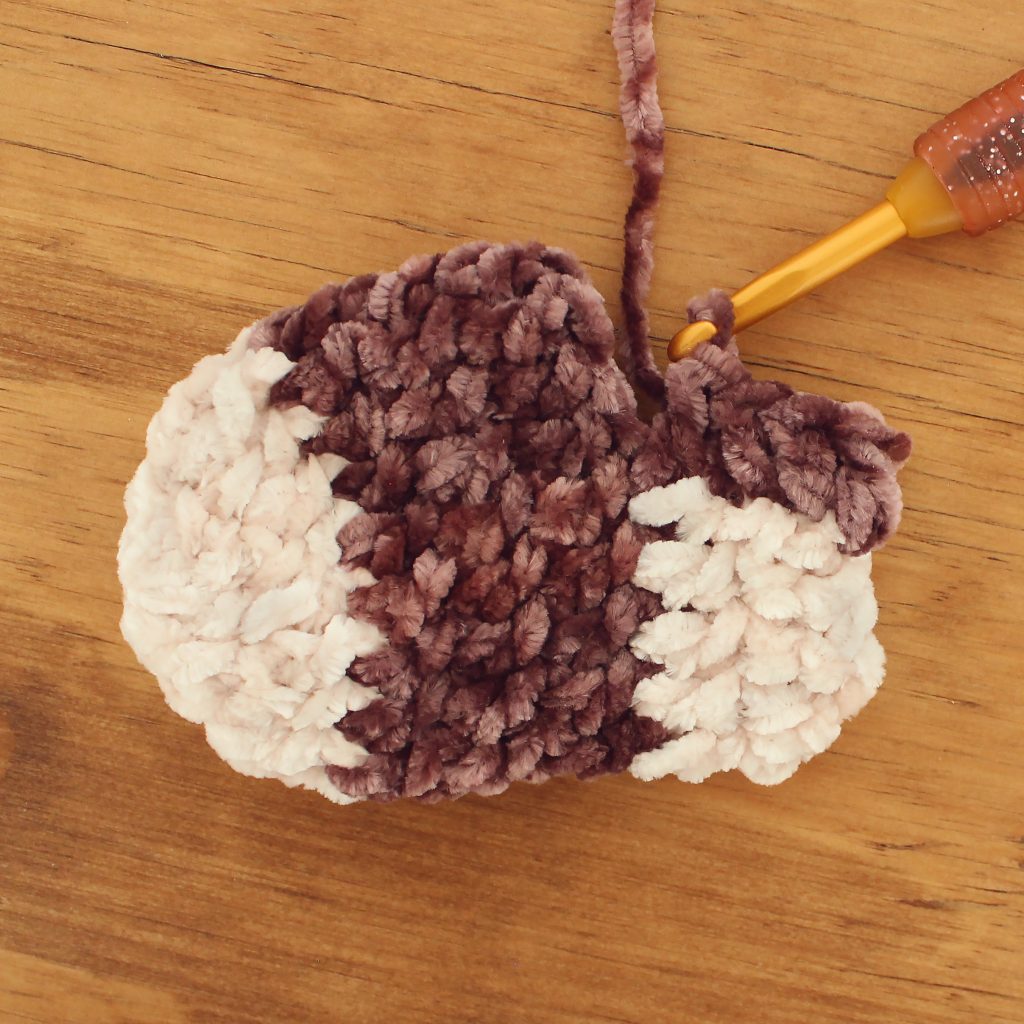
Then, you’ll work 4 dc along the edge of both heel rows as shown by the arrows.
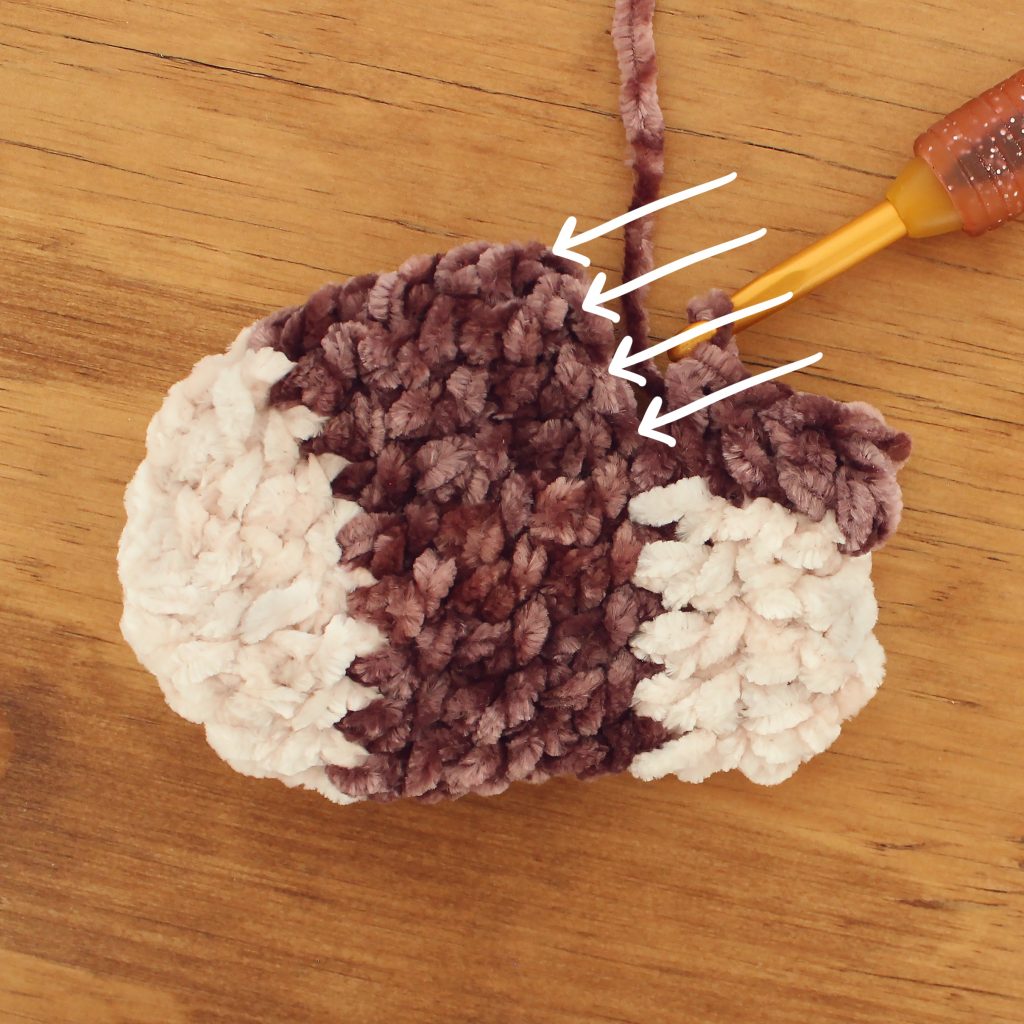
Next, you’ll be working into the 9 sts from round 5 that you didn’t make the heel in. The arrows in the first photo show the first 4 of those sts. The second photo shows after making the rest of the stitches and arriving to the other side of the heel.
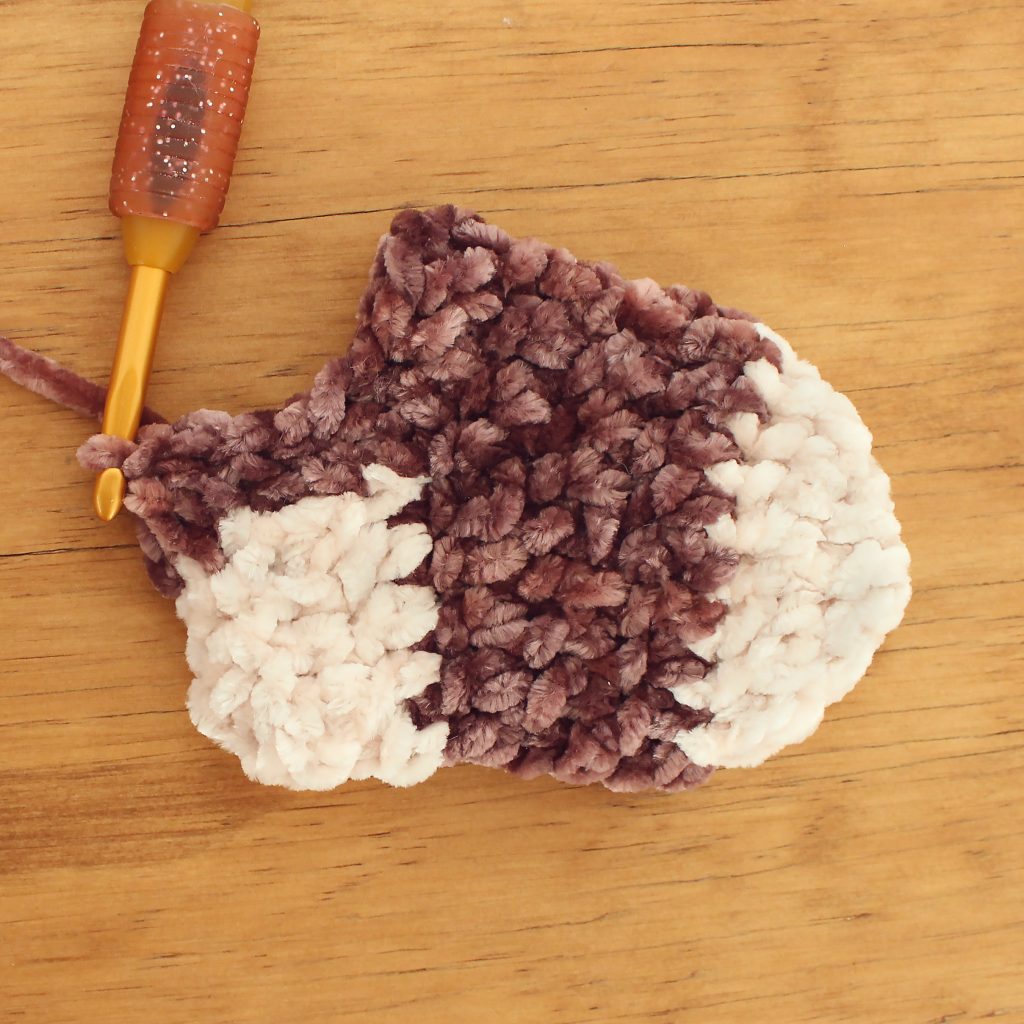
Now, just like in the beginning of this round, you’ll work 4 dc along the edge of both heel rows as shown by the arrows. Then, join to the top of the ch 2 at the beginning of the round.
How To Customize Your Stockings
These stockings look great as-is but they’re also a wonderful blank canvas, just begging for you to decorate and make them unique!
- Embroidery – Stitch a name on the cuff or even embroider some snowflakes, santa, or other Christmas design on the stocking!
- Patches – Iron on patches would be great for adding a monogram or another way to quickly add a design, if you don’t know how or don’t want to embroider. Just don’t use heat as it will melt the yarn. I’d recommend using fabric glue instead.
- Beads or sequins – Sew or glue on some sequins or beads to give your stocking some sparkle.
How To Use These Mini Velvet Stockings
- Hang them on your tree – These stockings would make cute ornaments, hanging on your Christmas tree, filled with candy canes, or even just by themselves.
- Give as gifts – They make the most perfect gift card, candy, or other small item holder!
- Decorate a gift – Tie one onto a gift along with a bow to give your wrapping a something extra!
- Make a garland/bunting – String several mini stockings onto a piece of twine along with some beads to create a garland/bunting to hang on your wall or mantel.
Share Your Finished Stocking Photos!
I hope you’ve enjoyed this pattern and I would love to see what you made! Please share your photos on social media and tag me @gleefulthings or use hashtag #gleefulthings. Don’t forget to add your project on Ravelry too! :)