Bearies Free Crochet Pattern
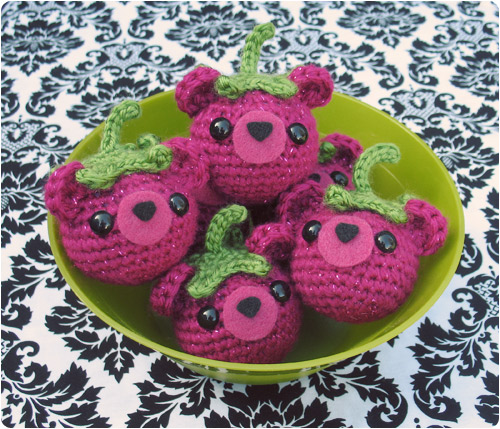
I have a new amigurumi pattern to share with you! I’ve been hanging on to this one for a while, trying to get some good photos before I posted. I’m so excited to finally show you! I hope you like! Enjoy! And send pics if you make any! I’d love to see! :D

● Size E crochet hook
● Yarn needle
● Stitch Marker
● Worsted weight yarn in pink (CA) & green (CB)
● 9mm safety eyes (2 for each)
● Stuffing
● Scraps of pink and black felt
● Fabric glue for attaching the nose
● Scissors
Yarn used above: Caron Simply Soft Party in Fuchsia Sparkle (CA) & Red Heart Soft Yarn in Guacamole (CB)

ch – chain
sc – single crochet
hdc – half double crochet
sc2tog – 2 single crochets together (decrease)
sl st – slip stitch
ea – each
st – stitch
rep – repeat
rnd – round
FO – finish/fasten off
CA – Color A (pink)
CB – Color B (green)

This pattern is worked in rounds using mainly single crochets (the top also uses half double crochets). Do not join at the end of rounds except where the patterns says to. You’ll probably want to use a stitch marker to mark your rounds. Gauge is not important but remember to keep your stitches tight.

HEAD
With CA, Ch 2.
rnd 1: 6 sc in 2nd ch from hook. (6)
rnd 2: 2 sc in ea st (12)
rnd 3: [1 sc, 2 sc in next st] rep around (18)
rnd 4: [2 sc, 2 sc in next st] rep around (24)
rnd 5: [3 sc, 2 sc in next st] rep around (30)
rnd 6-10 (5 rnds): 1 sc in ea st (30)
rnd 11: [3 sc, sc2tog] rep around (24)
rnd 12: [2 sc, sc2tog] rep around (18)
*Place the eyes between rnds 9 &10 with 5 sts between them.*
rnd 13: [1 sc, sc2tog] rep around (12)
*stuff*
rnd 14: sc2tog 6 times (6)
FO
TOP
*leave a 16 inch long piece of yarn in the beginning to make the stem with later length*
With CB, Ch 2.
rnd 1: 6 sc in 2nd ch from hook. (6)
rnd 2: 2 sc in ea st (12)
rnd 3: [ch 4. 1 sc in 2nd ch from hook. 1 hdc in ea remaining ch. 2 sc in rnd 2] rep 5 times.
Invisible join and FO leaving a piece of yarn long enough to attach the top to the head.
Making the stem: Use your hook to pull the piece of yarn that you left at the beginning through the center hole. Tie a slip knot as close to the hole as possible. Ch 8. 1 sl st in ea ch starting in 2nd ch from hook. Pull the end of the yarn back through the center hole and FO.
EARS
With CA, ch 2.
rnd 1: 1 sc, 6 dc, 1 sc in 2nd ch from hook.
Try to push all stitches to one side so that it forms a half circle.
ASSEMBLY
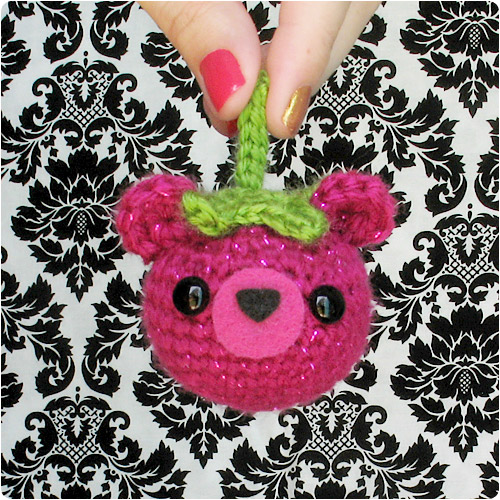
Position the top piece on the head so that you have a pointy part above each eye. Use your yarn needle and the piece of yarn that you left at the end of the top piece to attach the top to the head. You’ll only need to make about 6 stitches to hold it down. Next, to attach the ears, use your yarn needle to stitch the flat side of the half circle to the head. Refer to the photo for placement if you need to.
For the nose, cut a circle out of pink felt that will fit between the eyes (I used a penny as a pattern for mine). Then cut a little triangle nose out of black felt. Use your fabric glue to glue them in place.

If you use this free pattern, please consider supporting me by purchasing a pattern from my shop. Your support will help ensure that I’m able to continue making new patterns to share. Thanks for considering! :)

You are welcome and encouraged to sell any items you make using this pattern! All I ask in return is that when selling online, please credit Julie King / Gleeful Things & provide a link to www.gleefulthings.com.
You may NOT sell the pattern, distribute it in any form, repost it online, or alter it to claim it as your own (this includes charts & translations to other languages). Copyright © 2011 Julie King / Gleeful Things. All Rights Reserved.
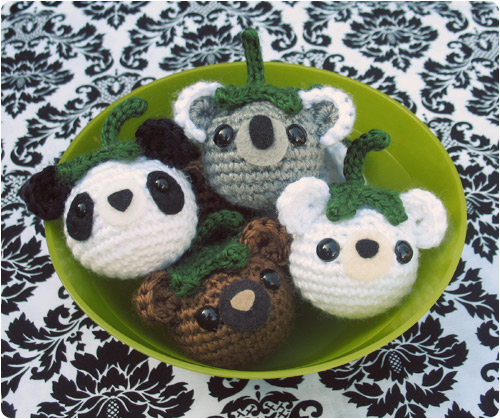

This is the cutest thing I have ever seen! Definitely making the panda asap :)
ps: thanks for making it free!! :)
This soooooo awesome! I can see these as ornaments for the Christmas tree.
That’s a cute idea!
These are soooo cute! I love the berry-bear ones with the sparkly yarn!
These are sooooo cute! Thanks for sharing!
Soooooo cute!!
Thank you to share this awesome pattern^^
I love them ! They are super cute ! You are one talented lady =D Awesome ! And thanks for making it free ! Im going to have to make these!
These are totally adorable!
I abosulutely loved making these. I made as a gift for a friend. I put them in canning jar to present to her as bear-ry preserves. She loved them. Thank you for making this pattern available.
That’s such a cute idea! This totally made me smile! :)
I’m in Love!!! <3 these little guys!
These are wayyyy toooo cuute! Good job!
These cuties actually made me get a book on crochet and start crocheting…I was able to make them finally :D thank you so much now I’ve got to try your tiny cactuses :P
What a creative idea and in my fave color! Thank you so much 8-)
I love these adorable little berries. I have just started back crocheting for my grandbabies. I am so thankful for you guys.
great ideas, instructions, wow and so helpful…..you can teach an old doggie new tricks….woof :)
keep them coming…. love it…. and so do my girls.
DARLING,,my great grandchildren will love them…………
Thanks for such a cute idea!
This is a very cute pattern and very easy to make. Thank you so much.
You have a wonderful gift and imagination, let alone talent. Keep thinking outside the square and I’ll certainly be looking at your website and patterns. M
These are so cute. I love them. Can’t wait to make them and thanks for the pattern.
amazing
Love the little bearies. Perfect for my Kindergarten class. Thanks
very cute… thanks for sharing!
I just LOVE these little guys! They are sooooo cute! Thank you for sharing the pattern.
ty ty ty…these are soo cute and I am going to make a bowl full.
im 13 and i just have to say i made one for my teacers baby and she loves it