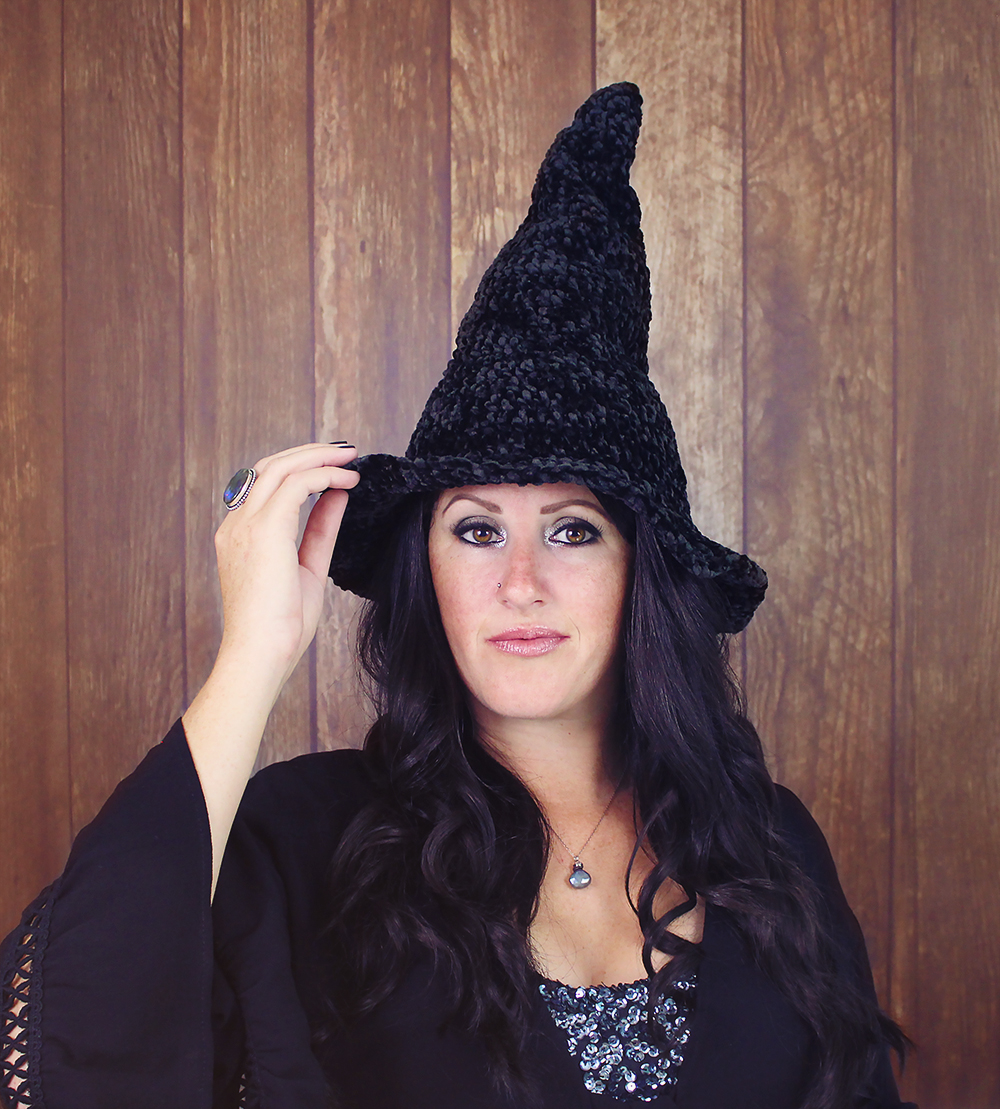
Velvet Witch Hat Free Crochet Pattern

Happy Halloween, everyone! I wasn’t planning on dressing up this year but then I got the idea that it would be a fun challenge to see what kind of costume I could put together using things I already have. No buying anything new! Have you ever tried this? I think you’d be surprised what you can come up with!
As I went through my closet, I found this black bell sleeve top (it’s actually a swim cover-up) and immediately saw witch potential! I knew it would be easy to put together a witchy outfit with it but I definitely don’t have a tall, pointy, black hat in my wardrobe. Naturally, I thought to crochet one so I turned to my stash to see what yarn I could use.
I seriously got so excited when I remembered that I had some black Bernat Velvet! I really love this yarn and it just seemed so perfectly witchy! I whipped up this hat in a couple hours and it only took about half a skein.
Disclosure: This post contains affiliate links. If you click and make a purchase, I will receive a small commission, at no extra cost to you. This, along with the ads shown on this blog, help to ensure that I’m able to continue posting free patterns and tutorials for you to enjoy. Thank you for your support!
Why You’ll Love This Easy Witch Hat
- Perfect for a last-minute costume – This is a really quick project and I bet you already have something in your wardrobe to go with it!
- Beginner Friendly – It’s a very simple witch hat that is made entirely with double crochets.
- Stash buster – While it looks great in velvet, you could definitely substitute another #5 bulky weight yarn from your stash, and you’ll only need about 155 yards.
- Easy to Customize – You could add all sorts of embellishments to this hat to make it your own!
Yarn
#5 bulky weight yarn: Approximately 155 yards of Bernat Velvet in #54008 Blackbird
Yarn Substitute Ideas
- Bernat Crushed Velvet – If you prefer a slightly tonal yarn that isn’t a solid color, this is perfect!
- Premier Retro Velvet, Yarn Bee Velvety Smooth, Paintbox Yarns Chenille – These are all very similar to Bernat Velvet, just with different color palettes, if you prefer a non-black witch hat.
Tips for Working with Velvet Yarn
Velvet yarn is so unique, I feel like there’s a little bit of a learning curve with it. Before you start this hat, be sure to check out these tips I shared on how to make working with it a little easier.
Download The Pattern
You can find the FREE pattern by scrolling down. A print-friendly, ad-free PDF of this pattern is also available for a small fee. If you enjoy my patterns, please consider purchasing the PDF – your support is greatly appreciated and will help me keep the new patterns coming! :)
Supplies
- US Size J/10 (6mm) crochet hook or size needed to obtain gauge
- yarn needle
- scissors
Difficulty
Easy
While it might look fancy because of the velvet yarn, this witch hat is actually really beginner friendly! Do you know how to double crochet? Because if so, you can do this!
Gauge
6 dc and 3 rounds = 2”
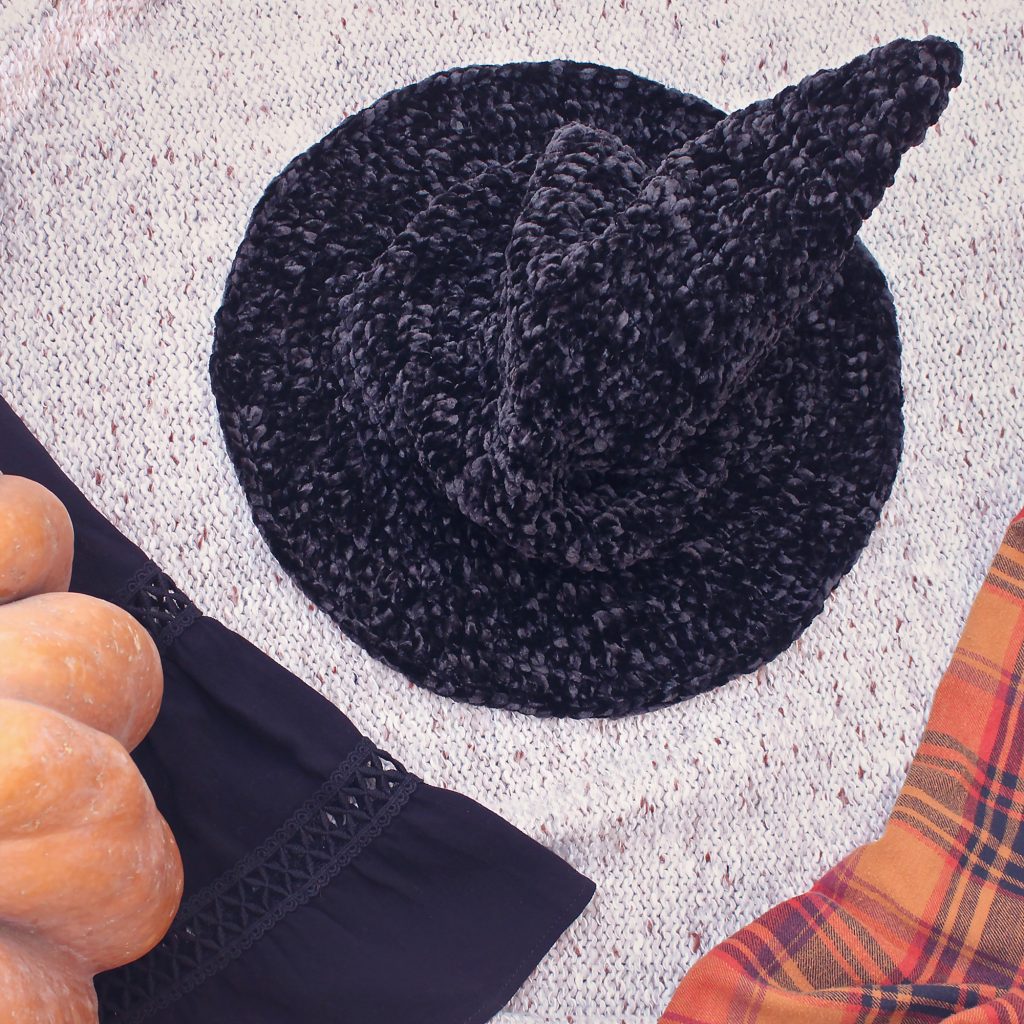
Finished Measurements
Length: 17” (from top point to edge of brim, laid flat)
Circumference before brim: 21” (at round 21)
Abbreviations
- ch(s) – chain(s)
- dc – double crochet
- st(s) – stitch(es)
- sl st – slip stitch
Terms of Use
You are welcome to sell any items you make using this pattern, in small quantities. Mass production is prohibited. When selling online, please credit Julie King / Gleeful Things by linking to www.gleefulthings.com or tagging @gleefulthings. You may NOT sell or distribute the pattern itself in any form, alter it to claim it as your own, post it online, or create a video demonstrating the pattern.
Notes
1. Pattern is worked in joined rounds, starting at the top.
2. Ch 2 at beginning of rounds will always count as 1 dc.
Instructions
Round 1: Make a magic ring, ch 2 (counts as 1 dc now and throughout), 5 dc in ring, sl st to top of ch 2 to join – 6 dc.
Round 2: Ch 2, 1 dc in same st, 2 dc in each st around, sl st to top of ch 2 to join – 12 dc.
Round 3: Ch 2, 1 dc in each st around, sl st to top of ch 2 to join – 12 dc.
Round 4: Ch 2, 2 dc in next st, *1 dc in next st, 2 dc in next st; repeat from * around, sl st to top of ch 2 to join – 18 dc.
Round 5: Ch 2, 1 dc in each st around, sl st to top of ch 2 to join – 18 dc.
Round 6: Ch 2, 1 dc in next st, 2 dc in next st, *1 dc in each of the next 2 sts, 2 dc in next st; repeat from * around, sl st to top of ch 2 to join – 24 dc.
Round 7: Ch 2, 1 dc in each st around, sl st to top of ch 2 to join – 24 dc.
Round 8: Ch 2, 1 dc in each of the next 2 sts, 2 dc in next st, *1 dc in each of the next 3 sts, 2 dc in next st; repeat from * around, sl st to top of ch 2 to join – 30 dc.
Round 9: Ch 2, 1 dc in each st around, sl st to top of ch 2 to join – 30 dc.
Round 10: Ch 2, 1 dc in each of the next 3 sts, 2 dc in next st, *1 dc in each of the next 4 sts, 2 dc in next st; repeat from * around, sl st to top of ch 2 to join – 36 dc.
Round 11: Ch 2, 1 dc in each st around, sl st to top of ch 2 to join – 36 dc.
Round 12: Ch 2, 1 dc in each of the next 4 sts, 2 dc in next st, *1 dc in each of the next 5 sts, 2 dc in next st; repeat from * around, sl st to top of ch 2 to join – 42 dc.
Round 13: Ch 2, 1 dc in each st around, sl st to top of ch 2 to join – 42 dc.
Round 14: Ch 2, 1 dc in each of the next 5 sts, 2 dc in next st, *1 dc in each of the next 6 sts, 2 dc in next st; repeat from * around, sl st to top of ch 2 to join – 48 dc.
Round 15: Ch 2, 1 dc in each st around, sl st to top of ch 2 to join – 48 dc.
Round 16: Ch 2, 1 dc in each of the next 6 sts, 2 dc in next st, *1 dc in each of the next 7 sts, 2 dc in next st; repeat from * around, sl st to top of ch 2 to join – 54 dc.
Round 17: Ch 2, 1 dc in each st around, sl st to top of ch 2 to join – 54 dc.
Round 18: Ch 2, 1 dc in each of the next 7 sts, 2 dc in next st, *1 dc in each of the next 8 sts, 2 dc in next st; repeat from * around, sl st to top of ch 2 to join – 60 dc.
Round 19: Ch 2, 1 dc in each st around, sl st to top of ch 2 to join – 60 dc.
Round 20: Ch 2, 1 dc in each of the next 8 sts, 2 dc in next st, *1 dc in each of the next 9 sts, 2 dc in next st; repeat from * around, sl st to top of ch 2 to join – 66 dc.
Round 21-23: Ch 2, 1 dc in each st around, sl st to top of ch 2 to join – 66 dc.
Round 24: Ch 2, 1 dc in each of the next 4 sts, 2 dc in next st, *1 dc in each of the next 5 sts, 2 dc in next st; repeat from * around, sl st to top of ch 2 to join – 77 dc.
Round 25: Ch 2, 1 dc in each of the next 5 sts, 2 dc in next st, *1 dc in each of the next 6 sts, 2 dc in next st; repeat from * around, sl st to top of ch 2 to join – 88 dc.
Round 26: Ch 2, 1 dc in each of the next 6 sts, 2 dc in next st, *1 dc in each of the next 7 sts, 2 dc in next st; repeat from * around, sl st to top of ch 2 to join – 99 dc.
Round 27: Ch 2, 1 dc in each of the next 7 sts, 2 dc in next st, *1 dc in each of the next 8 sts, 2 dc in next st; repeat from * around, sl st to top of ch 2 to join – 110 dc.
Round 28: Ch 2, 1 dc in each of the next 8 sts, 2 dc in next st, *1 dc in each of the next 9 sts, 2 dc in next st; repeat from * around, invisible join to top of ch 2 and fasten off – 121 dc.
How to Stiffen the Brim
The brim on this hat is naturally a little floppy, but in a cute way, similar to a bucket hat. If that’s not your style and you would prefer the brim to be stiffer, you could crochet the final round over black pipe cleaner or a piece of jewelry wire. This would allow you to shape it however you want.
How to Customize Your Hat
There are so many fun ways to decorate your witch hat to make it more exciting and unique!
- Add sequins or beads – Sew or glue on some sequins or beads to give your hat some sparkle.
- Crocheted shapes – Crochet some small items like stars, moons, etc. and stitch them onto your hat.
- Embroidery – This is another great way to add some additional design to the hat by stitching something in a contrasting yarn color.
- Ribbon – Create an easy band for your hat with ribbon. You could even add some extras to it like feathers or crystals.
How to Wear Your Witch Hat
I recommend stuffing a plastic bag into the hat when you wear it so that it doesn’t flop over. It should stand up tall but have a little slouchiness to it so it isn’t completely stiff. It you want it completely stiff, you’ll need to stuff it more. Plastic bags are a great option because they’re so light weight.
Share Your Project!
I hope you’ve enjoyed this pattern and I would love to see what you made! Please share your photos on social media and tag me @gleefulthings or use hashtag #gleefulthings. Don’t forget to add your project on Ravelry too! :)

How sweet! I love it!